To disassemble motorcycle forks, first, remove the front wheel and brake caliper. Then, loosen the top triple clamp and fork cap, slide out the fork tubes, and separate the inner and outer assemblies.
Carefully adhere to these guidelines for disassembling motorcycle forks. Motorcycle fork disassembly is a crucial task for riders who want to enhance their bike’s performance or address any issues with the forks. Whether you’re planning to replace fork seals, upgrade suspension components, or make adjustments, understanding the disassembly process is essential.
By following a specific set of steps, you can easily remove the forks from your motorcycle for inspection, cleaning, or repair purposes. This comprehensive guide will walk you through the necessary precautions and steps to disassemble motorcycle forks effectively and safely.
Credit: blog.pro-x.com
How to Disassemble Motorcycle Forks: Step by Step Guide
Preparing For Fork Disassembly
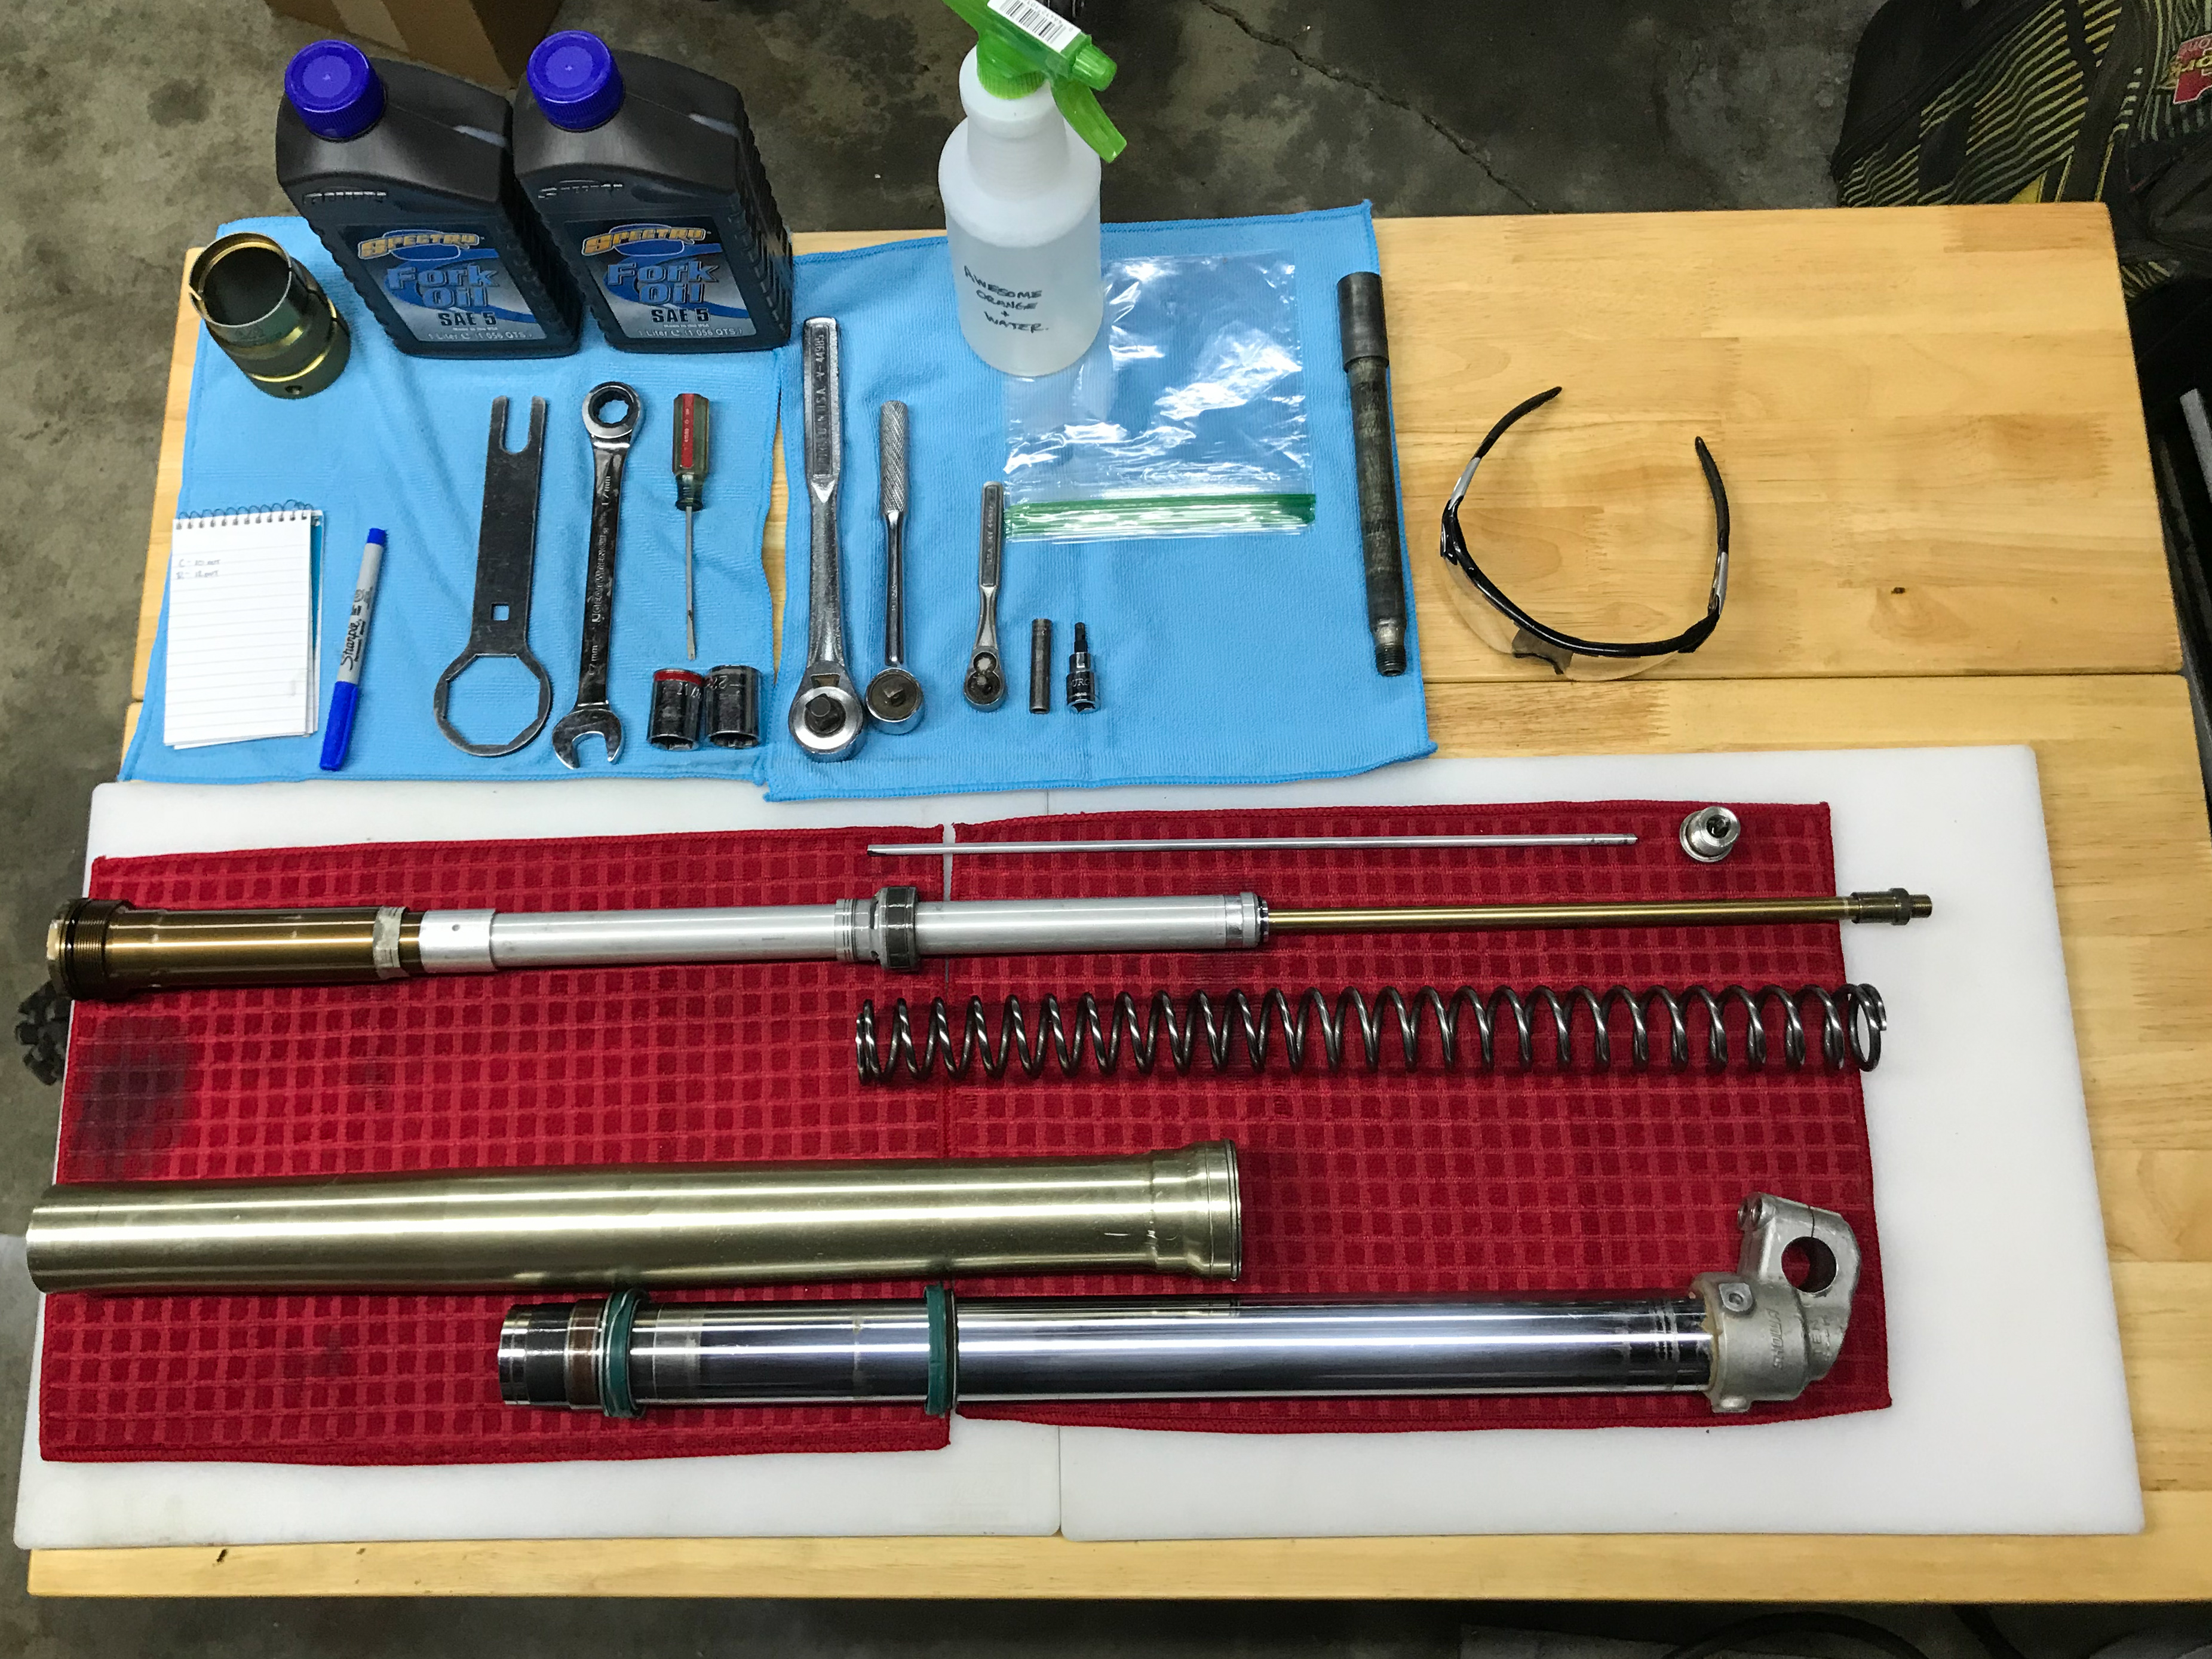
Preparing for Fork Disassembly requires thorough cleaning of the motorcycle and gathering the necessary tools in a suitable workspace.
Start by meticulously cleaning the motorcycle to remove any dirt, debris, or grease that may have accumulated on the forks. Use a gentle degreaser and a soft cloth to ensure the forks are free from any contaminants.
Gather the necessary tools needed for the disassembly process. These typically include a socket set, wrenches of varying sizes, a torque wrench, a rubber mallet, and a vice. Ensure that all tools are in good condition, and if any are missing, consult a motorcycle mechanic or purchase them before proceeding.
Additionally, find a workspace that provides ample room to work on the forks without any obstacles. Ideally, this area should be well-lit and have a flat surface to place the motorcycle during disassembly. A sturdy workbench or a stable area in a garage can serve as suitable workspaces for this task.
Removing The Forks
| Removing the Forks |
|---|
| Loosening the front wheel |
| Removing the front brake calipers |
| Detaching the front fender |
| Loosening the triple clamps |
| Sliding out the fork tubes |
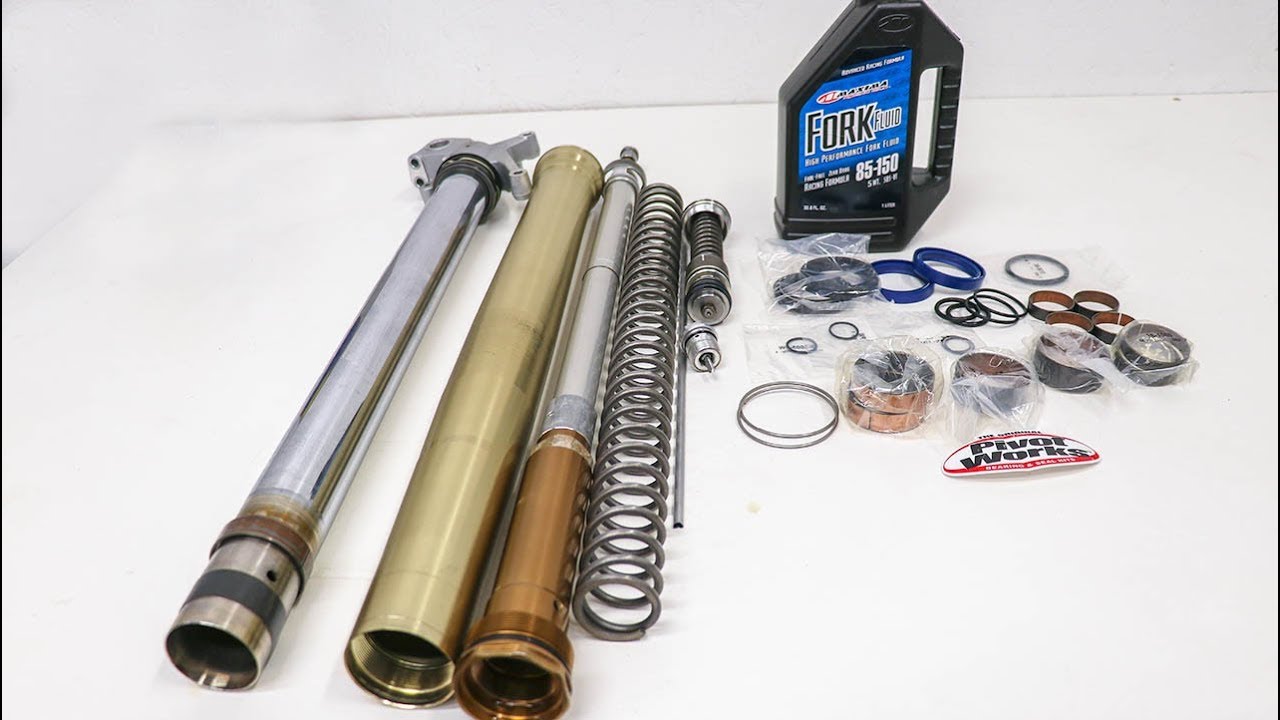
Disassembling The Fork Tubes
Disassembling the Fork Tubes requires several steps in order to properly disassemble your motorcycle forks. The first step is draining the fork oil. Make sure to securely support the motorcycle and remove the fork caps. Next, you’ll need to remove the fork springs. Be cautious as the springs may be under tension. After that, unscrew the rebound adjusters. This will allow you to access the damper rods. Finally, carefully take out the damper rods to complete the disassembling process.
Dismantling The Triple Clamps
When dismantling motorcycle forks, one crucial step is to dismantle the triple clamps. This involves marking the alignment of the triple clamps to ensure proper reassembly. To begin, start by removing the upper triple clamp. Carefully loosen any bolts or screws securing the upper clamp, then gently lift it off the bike.
Next, proceed to loosen and separate the lower triple clamp. Use the appropriate tools to loosen any fasteners holding the lower clamp in place. Once loosened, carefully separate the lower clamp from the motorcycle frame.
Lastly, detach the handlebars from the triple clamps. Loosen any bolts or screws securing the handlebars to the clamps, and carefully remove the handlebars. It is important to take note of how the handlebars are positioned to ensure proper reassembly later on.
Cleaning And Inspecting The Fork Components
Cleaning and inspecting the fork components is an essential part of disassembling motorcycle forks. You need to clean the fork tubes and internal parts thoroughly to remove any dirt or debris that may affect performance. Additionally, it is crucial to inspect the fork tubes for damage or wear. Look for any signs of pitting, corrosion, or dents that could compromise their structural integrity.
Furthermore, examine the dampers for leaks or problems. Check for any oil leaks or signs of excessive wear on the damper rods. Lastly, check the fork seals for integrity. Ensure that the seals are in good condition and not leaking. By following these steps, you can ensure that your motorcycle forks are clean and in optimal condition.
Reassembling The Forks
Reassembling the forks involves several important steps. First, **assemble the triple clamps** securely onto the motorcycle frame. Make sure to tighten the bolts properly to ensure stability and safety. Next, **install the fork tubes** carefully into the triple clamps, aligning them properly with the frame and ensuring they slide smoothly. Then, **refill the forks** with fresh oil, ensuring the correct amount and type of oil is used for optimal performance.
After that, **reinstall the fork springs**, making sure they are properly seated and secured. Finally, **adjust the rebound adjusters** according to your preference and riding style, ensuring a comfortable and responsive ride. It is important to follow each step carefully to ensure the forks are assembled correctly and function properly.
Reinstalling The Forks
Reinstalling the forks involves a series of steps to ensure proper alignment and secure attachment. After disassembling the motorcycle forks, the next step is sliding them back into the triple clamps. Care must be taken to align the fork tubes with the front axle while gently guiding them into position. Once in place, tighten the triple clamp bolts using the manufacturer-recommended torque specifications.
Next, reattach the front fender to the forks, ensuring it is securely fastened. This step helps protect the front wheel and adds stability to the bike. Additionally, the front brake calipers need to be put back in place, aligning them properly with the disc rotor. Ensure the caliper bolts are tightened to the recommended torque settings.
Lastly, tighten the front wheel axle to secure the front wheel in position. This step is crucial for maintaining stability and safe handling. The front wheel should move freely, without any wobbling or misalignment.
Testing And Final Touches
Checking the **fork action** and rebound is an essential step after disassembling motorcycle forks. This ensures that the forks are functioning properly and providing the desired suspension response. It involves inspecting the fork’s compression and rebound settings, making adjustments if necessary. Next, **adjusting the fork preload** is crucial for finding the right balance between comfort and stability. This setting determines how much the fork compresses when weight is applied.
Another important aspect is **reconnecting the handlebars**, which involves aligning and securing the handlebars back onto the fork tubes. This ensures proper steering control. Lastly, **cleaning the motorcycle** is necessary after the disassembly process to remove any dirt, grease, or debris that may have accumulated. It is vital to have a clean and well-maintained motorcycle for optimal performance and longevity.
Frequently Asked Questions Of How To Disassemble Motorcycle Forks
How Do You Take Apart A Bike Fork?
To take apart a bike fork, follow these steps: 1. Remove the front wheel from your bike. 2. Loosen and remove the bolts securing the fork to the frame. 3. Carefully slide the fork out of the frame, being mindful of any cables or brake lines.
4. Disassemble the fork by unscrewing the top cap, removing any spacers or washers. 5. Separate the stanchions and lower legs of the fork to access internal parts, if needed. Remember to be cautious and consult a professional if you are not confident in your skills.
How Do You Remove Front Forks From A Motorcycle?
To remove front forks from a motorcycle, follow these steps: 1. Loosen the triple clamp bolts using a socket wrench. 2. Remove any components attached to the forks, such as the brake caliper or fender. 3. Slide the forks down and out of the triple clamp.
4. Carefully pull the forks out of the front wheel axle, ensuring not to damage any parts.
How Do You Bend Back Motorcycle Forks?
To bend back motorcycle forks, follow these steps: 1. Lift the front end of the motorcycle using a jack or stand. 2. Use a heat source like a blowtorch to apply heat to the bent area. 3. Apply controlled pressure using a hydraulic press or pipe to gradually bend the forks back into shape.
4. Monitor the progress carefully, ensuring the forks are aligned properly. Remember: This task requires precision and should ideally be done by a professional to avoid potential hazards or damage to the motorcycle.
How Much Does It Cost To Rebuild Motorcycle Forks?
Rebuilding motorcycle forks can cost between $100-$500, depending on the type and extent of the work needed.
Conclusion
To conclude, disassembling motorcycle forks requires the right knowledge and tools, but it is a manageable task if approached carefully. By following the step-by-step instructions outlined in this blog post, you can successfully remove and dismantle your motorcycle forks. Remember the importance of safety precautions, such as wearing protective gear and securing the bike properly.
Take note of any special instructions or considerations for your specific motorcycle model, as they may vary. Maintaining your motorcycle forks is crucial for optimal performance and safety on the road. Regularly inspecting and cleaning the forks will help identify any issues and prevent costly repairs or accidents in the future.
So, don’t hesitate to give your motorcycle forks the attention they deserve and keep enjoying the exhilarating ride on your beloved bike. Happy riding!