To wire headlights directly to the battery, first, disconnect the negative terminal of the battery, then connect the wire from the positive terminal of the battery to the positive wire of the headlights.

Credit: upce.org.uk
Importance Of Direct Wiring For Headlights
Directly wiring your headlights to the battery can offer several benefits. One crucial advantage is achieving brighter and more efficient lighting. By eliminating the need for the headlights to rely on the vehicle’s wiring harness, any potential voltage drop issues can be avoided.
This ensures that the headlights receive a steady and optimal power supply, resulting in brighter and more consistent illumination on the road. Furthermore, direct wiring bypasses the limitations imposed by the factory wiring, allowing you to utilize aftermarket bulbs that produce higher levels of brightness. Overall, bypassing the vehicle’s wiring system and connecting the headlights directly to the battery provides a reliable solution for enhancing visibility and achieving superior lighting performance.
Necessary Tools And Materials
When wiring headlights directly to the battery, there are a few necessary tools and materials that you will need:
| Wiring harness | A wiring harness is essential for connecting the headlights to the battery. It serves as a bridge between the two. |
| Battery terminals | These terminals provide the connection points between the battery and the wiring harness. |
| Fuse holder | A fuse holder is crucial for protecting the headlights and wiring from potential electrical issues and short circuits. |
| Wire cutters and strippers | These tools are necessary for cutting and stripping the wire, ensuring a clean connection. |
| Electrical tape | Electrical tape is used to secure and insulate the wiring connections, preventing any accidental shorts. |
How to Wire Headlights Directly to Battery: Step by Step Guide
Step 1: Gather The Required Materials
Before wiring your headlights directly to the battery, you will need to make sure you have all the necessary tools and materials. Here is a list of what you will need:
- Headlight wiring harness
- Wire cutters
- Wire strippers
- Electrical tape
- Zip ties
- Butt connectors
- Heat shrink tubing
- Screwdriver or socket wrench
Having all these materials at hand will ensure a smooth and efficient wiring process. It’s important to gather everything before you start, so you don’t have to pause midway and search for missing tools or supplies.
Once you have everything ready, you can proceed to the next step of wiring your headlights directly to the battery.
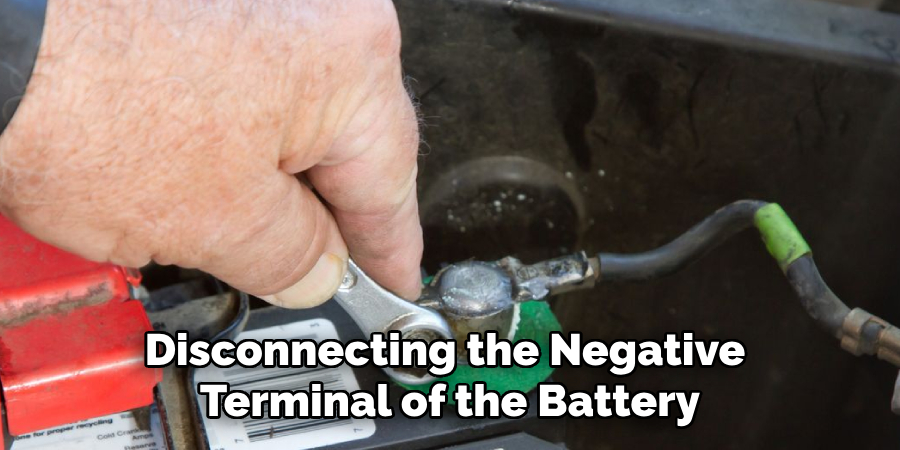
Step 2: Disconnect The Negative Terminal Of The Battery
It is crucial to take safety precautions before working on any electrical components of a vehicle, including wiring the headlights directly to the battery. One of the first steps is to disconnect the negative terminal of the battery. This is important to prevent any electrical accidents or mishaps.
By disconnecting the negative terminal of the battery, you are effectively cutting off the source of power to the electrical system of the vehicle. This reduces the risk of accidental short circuits or electrical shocks. Remember to wear appropriate safety gear, such as gloves and goggles, to protect yourself.
Before starting any wiring work, ensure that the vehicle is turned off and the ignition key is removed. Locate the negative terminal, which is usually labeled with a “-” symbol, and use a wrench or socket to loosen the terminal nut. Once the terminal is loose, carefully disconnect the cable from the battery.
Always handle the battery with care and avoid any contact between the negative cable and any metal parts of the vehicle. This will ensure that there are no accidental sparks or electrical discharges. Take your time to disconnect the negative terminal properly before proceeding with the wiring process.
Step 3: Locate The Headlight Wiring Harness
When wiring headlights directly to the battery, the third step is to locate the headlight wiring harness. This harness is typically found near the headlights or in the engine bay. By locating the wiring harness, you will be able to easily connect the wires from the headlights to the battery. Ensure that the wires are properly insulated and secure to avoid any potential hazards or damage.
Step 4: Identify The Positive And Negative Wires
In the process of wiring headlights directly to the battery, it is important to identify the positive and negative wires. This step helps to differentiate between the power and ground wires.
| Step | Description |
|---|---|
| Step 1 | Locate the headlight harness near the headlights. |
| Step 2 | Inspect the wires and look for color coding. |
| Step 3a | Red or orange wires usually indicate the positive (+) wire. |
| Step 3b | Black or white wires usually indicate the negative (-) wire. |
| Step 5 | Use a multimeter to confirm the polarity. |
| Step 6 | Label the wires to avoid confusion during installation. |
Step 5: Cut The Wires Of The Headlight Harness
Taking the necessary steps to wire the headlights directly to the battery can save you the hassle of dealing with a faulty headlight switch. In Step 5, you will focus on cutting the wires of the headlight harness. It is important to separate the power and ground wires from the harness to ensure proper functioning.
When cutting the wires, make sure to use a sharp tool to achieve clean cuts. Take caution not to damage any other wires or important components in the process. Once you have cut the wires, you can proceed with connecting the power and ground wires directly to the battery.
By wiring the headlights directly to the battery, you can have more control over their operation and bypass any potential issues with the headlight switch. This can ensure a reliable and efficient lighting system for your vehicle.
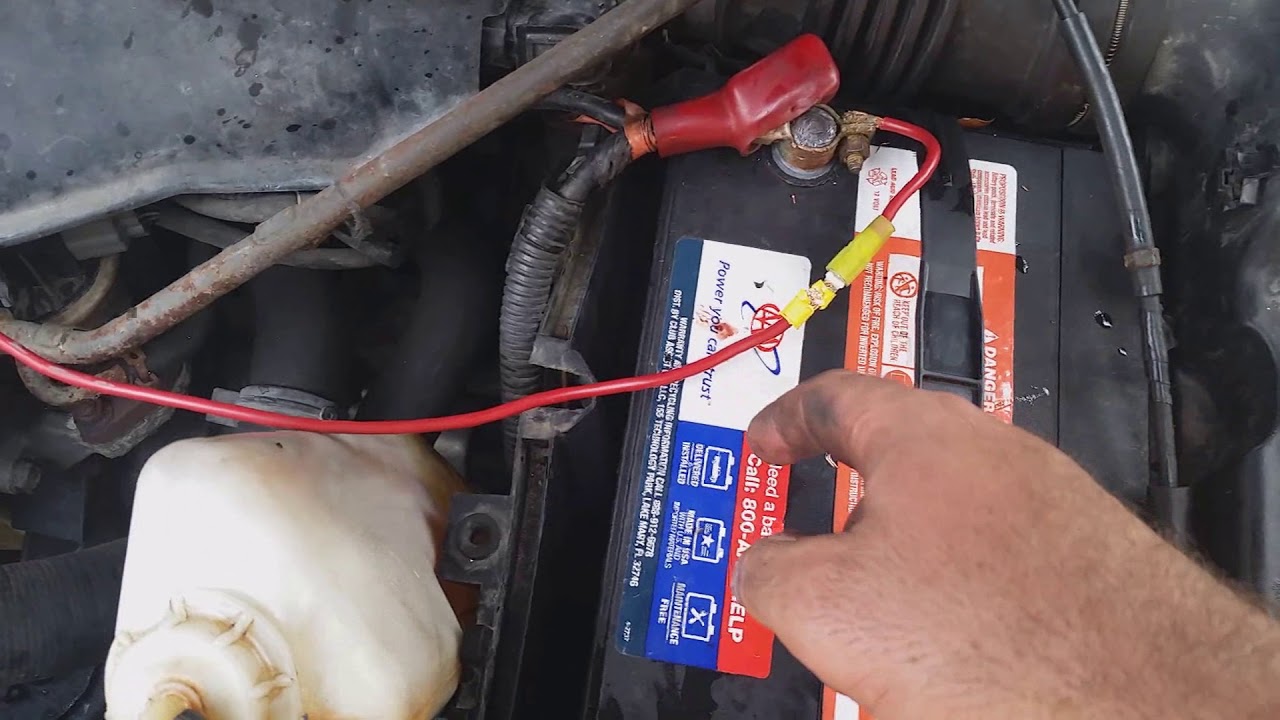
Step 6: Connect A Fuse Holder To The Positive Wire
When wiring headlights directly to the battery, it is crucial to connect a fuse holder to the positive wire. This step is essential as it protects the circuit in case of electrical overload. The fuse acts as a safeguard, preventing damage to the headlights and other components in the event of excessive current flow.
By incorporating a fuse holder, you ensure the longevity and reliability of your headlight system. It is important to select the appropriate fuse size based on the power requirements of your headlights. Regularly inspect the fuse to ensure it is intact and functioning correctly. This simple addition can prevent potential electrical issues and provide peace of mind while driving at night.
Step 7: Connect The Positive Wire To The Battery
When wiring headlights directly to the battery, connecting the positive wire to the battery is an important step. To establish this connection, you can utilize a battery terminal. The battery terminal acts as a secure connection point for the positive wire, ensuring a reliable power source for your headlights.
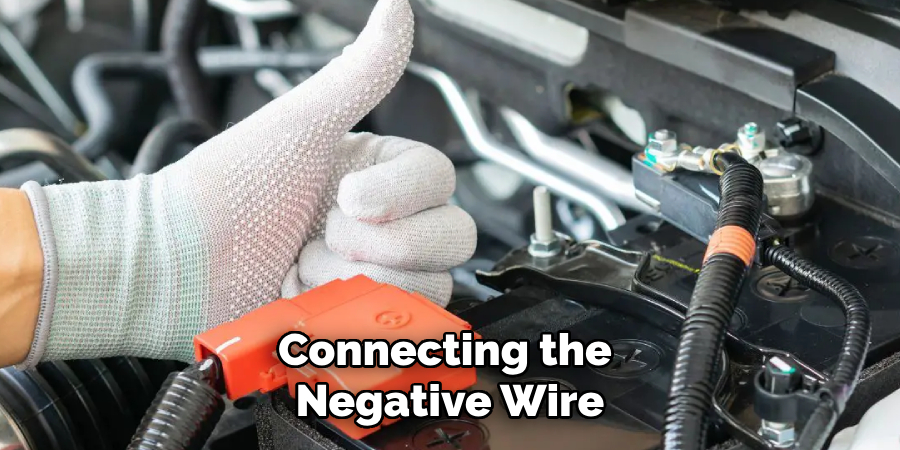
Step 8: Connect The Negative Wire To The Battery
Connecting the negative wire of the headlights directly to the battery is a crucial step in the process. To do this, you will need to use a battery terminal to ensure a secure and stable connection. The battery terminal acts as a bridge between the negative wire and the battery, allowing the flow of electricity to power the headlights.
When connecting the negative wire, make sure to strip off the insulation from the end of the wire. Then, insert the bare wire into the battery terminal and tighten the bolt or screw to secure it in place. Double-check that the connection is tight and secure, as loose connections can result in flickering headlights or even a complete loss of power.
Once the negative wire is securely connected, you can proceed with the remaining steps to complete the process of wiring the headlights directly to the battery.
Step 9: Insulate The Connections
In Step 9 of wiring headlights directly to the battery, it is important to insulate the connections to ensure a secure and safe setup. By insulating the connections, you protect them from moisture, corrosion, and potential short circuits. To insulate the connections, start by wrapping each connection with electrical tape. Make sure to wrap the tape tightly and securely, completely covering all exposed wires and connectors.
Additionally, you can use heat shrink tubing for added protection. Slide the heat shrink tubing over the connection and use a heat gun to shrink it, creating a tight seal. This will provide an extra layer of insulation and durability.
Moreover, always double-check your connections to ensure they are secure and properly insulated. Any loose or exposed wires increase the risk of accidents or electrical issues.
In conclusion, insulating the connections is a crucial step in wiring headlights directly to the battery. It ensures a safe and reliable setup that will effectively power your headlights without any potential hazards or malfunctions.
Step 10: Reconnect The Battery Terminal
| After completing the wiring process, it’s time to restore power to your headlights. Begin by reconnecting the battery terminal. Ensure that you reconnect the positive (+) terminal first, followed by the negative (-) terminal. |
| Restore power and test the headlights |
| With the battery terminal reconnected, you can now check if your headlights are functioning correctly. Turn on your headlights and verify if both the low and high beams are working as expected. If any issues arise, double-check all the connections and ensure that the wiring is properly done. |
By following these steps, you can successfully wire your headlights directly to the battery. Remember to exercise caution while handling electrical components and ensure a secure connection to avoid any hazards. Enjoy the enhanced performance and reliability of your headlights!
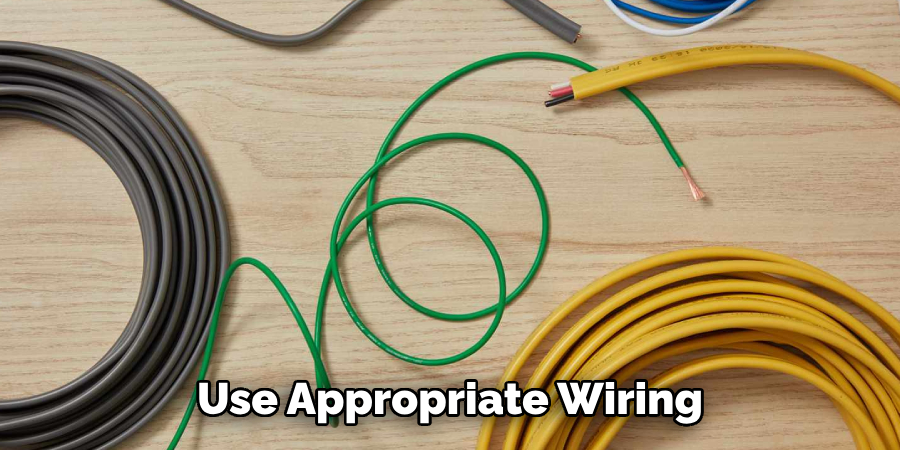
Tip 1: Ensure Proper Wire Sizing
When wiring headlights directly to the battery, it is crucial to ensure that you use appropriate gauge wire for the current load. Using the correct wire size will help prevent electrical problems and ensure a reliable connection.
The gauge of wire you need will depend on the power requirements of your headlights. Most headlights typically draw around 20-30 amps, so it’s important to choose a wire gauge that can handle this current without overheating.
For headlights drawing up to 20 amps, a 14-gauge wire is usually sufficient. However, if your headlights draw more than 20 amps, you may need to use a thicker wire, such as a 12-gauge or even 10-gauge wire to prevent voltage drop and overheating.
Note: It’s always recommended to consult the manufacturer’s guidelines or a professional to determine the appropriate wire gauge for your specific headlight setup.
Tip 2: Use A Wiring Diagram Or Reference Guide
When it comes to wiring headlights directly to the battery, using a wiring diagram or reference guide can be extremely helpful. These resources provide a clear understanding of the specific wiring scheme for your headlights, ensuring that you connect everything correctly.
By referring to a wiring diagram or reference guide, you can easily identify the specific wires and connectors that need to be connected to the battery. This eliminates any guesswork and minimizes the risk of damaging your headlights or other electrical components.
Moreover, a wiring diagram or reference guide helps you determine the correct voltage and amperage requirements for your headlights. This ensures that you choose the appropriate wire gauge and fuse size to handle the electrical load safely.
In addition, using a wiring diagram or reference guide saves you valuable time and effort by providing a visual representation of the wiring connections. You can easily follow the diagram or guide step-by-step, ensuring a successful and efficient wiring process.
Tip 3: Consider Professional Assistance
If you are uncertain about how to wire your headlights directly to the battery, it is essential to seek the help of a professional electrician. Wiring electrical components can be complicated and dangerous if not done correctly. It is better to be safe than sorry when it comes to working with the electrical system of your vehicle.
A professional electrician will have the knowledge and expertise to ensure that the wiring is done properly and safely. They can also provide guidance and advice on the best approach to take. Don’t hesitate to reach out to a professional if you have any doubts or concerns. It is always better to have a professional handle the task to avoid any potential risks or damage.
Frequently Asked Questions On How To Wire Headlights Directly To Battery
How Do You Wire Headlights Directly To The Battery?
To wire headlights directly to the battery, first, identify the positive and negative terminals on the battery. Then, connect the positive wire from the headlight to the positive terminal of the battery, and the negative wire from the headlight to the negative terminal of the battery.
Use appropriate wiring and connectors to ensure a secure and reliable connection.
What Are The Benefits Of Wiring Headlights Directly To The Battery?
Wiring headlights directly to the battery can provide several benefits. It ensures a consistent and stable power supply to the headlights, preventing any flickering or dimming issues. It also reduces the load on the headlight switch, prolonging its lifespan. Moreover, direct wiring allows for more control over the lighting system, enabling adjustments for brightness or installing additional accessories.
Can I Wire My Led Headlights Directly To The Battery?
Yes, you can wire your LED headlights directly to the battery. LED headlights require a low voltage and draw less power compared to traditional halogen bulbs. Ensure proper wiring, and use a fuse in-line with the positive wire to protect the circuit.
Consult the manufacturer’s guidelines and specifications for proper installation and functionality.
Conclusion
To sum it up, wiring your headlights directly to the battery can provide a more efficient and reliable lighting system for your vehicle. By following the step-by-step guide outlined in this blog post, you can confidently take on this DIY project.
Remember to prioritize safety and consult professional help if needed. With the right tools and knowledge, you’ll be able to upgrade your headlights and enjoy enhanced visibility on the road.