To jet a dirt bike, adjust the carburetor by changing the jetting to optimize the air and fuel mixture. Jetting a dirt bike involves adjusting the carburetor to ensure the air and fuel mixture is optimized for optimal performance.
This is achieved by changing the jetting, which determines the amount of fuel that enters the carburetor. By adjusting the jetting, riders can improve throttle response, increase horsepower, and enhance overall engine performance. Jetting is particularly crucial when riding at higher altitudes or in extreme weather conditions, as these factors can significantly impact the bike’s performance.
We will explore the step-by-step process of jetting a dirt bike to help riders achieve peak performance on various terrains.

Credit: m.youtube.com
Understanding The Basics Of Jetting
Understanding the basics of jetting is crucial for achieving optimal performance of your dirt bike. The carburetor system plays a vital role in the overall functioning of the bike, and proper jetting ensures that the fuel-to-air mixture is balanced.
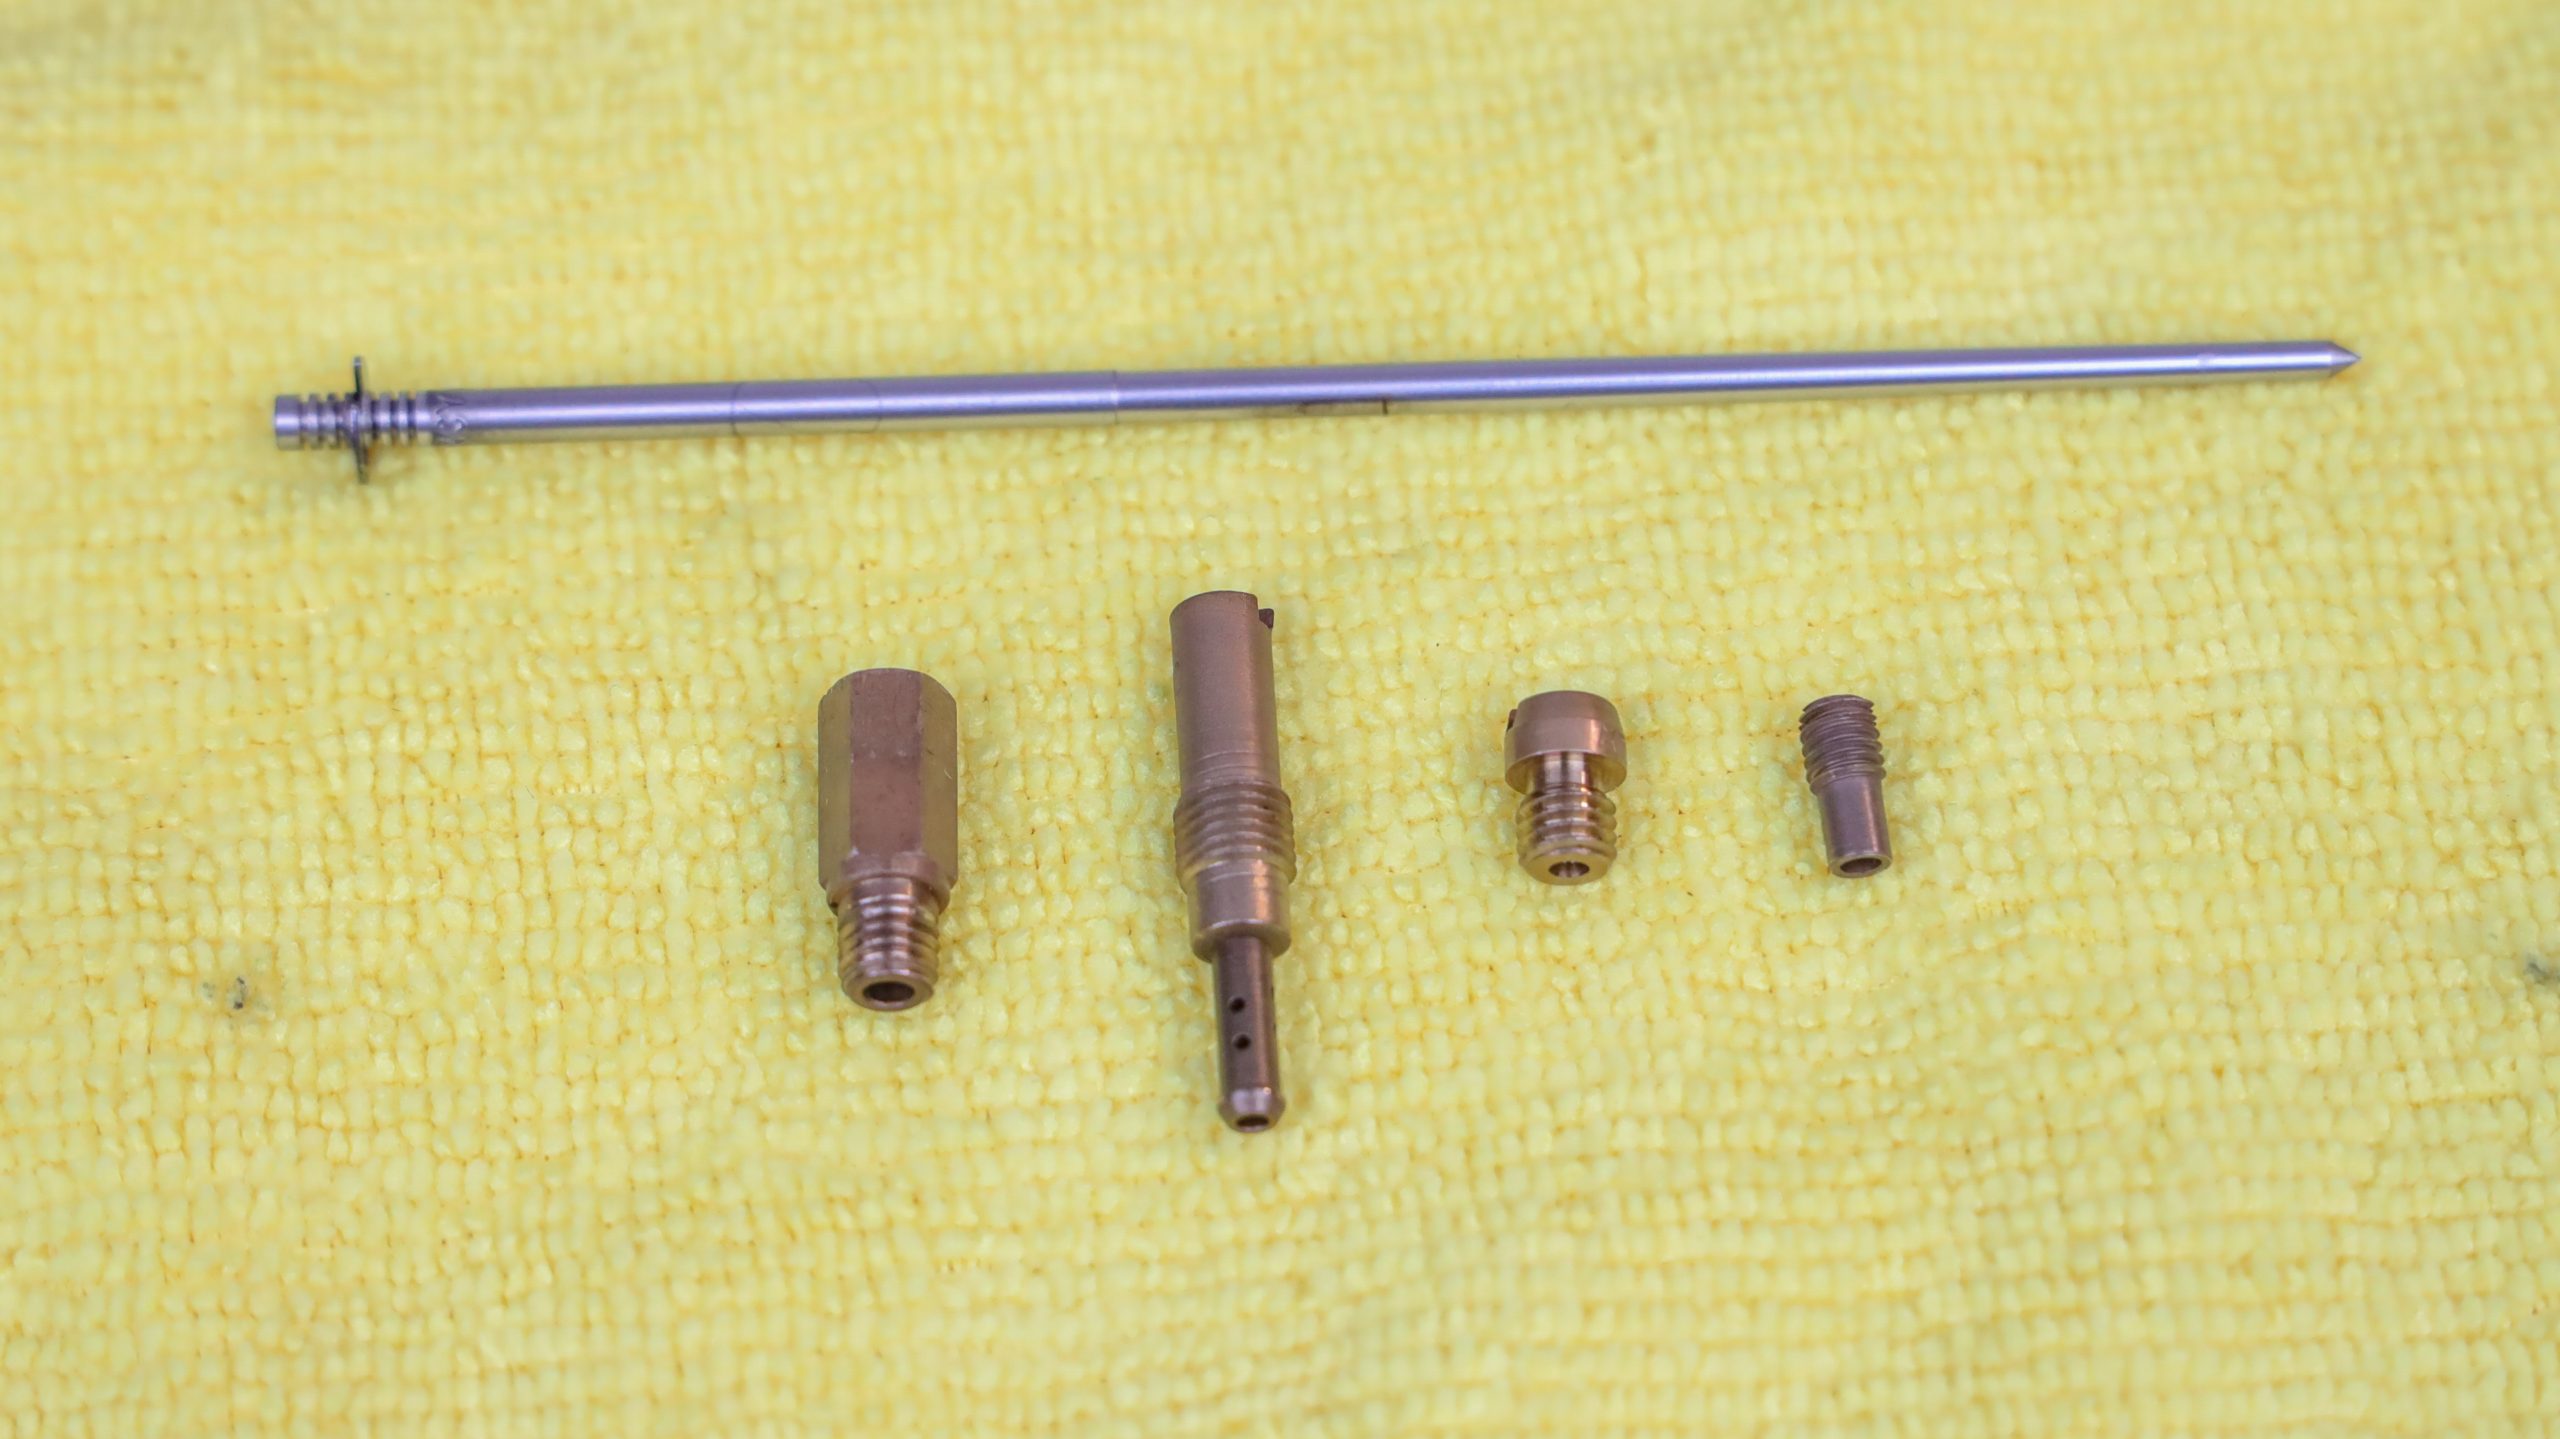
The carburetor system consists of several components, such as the jets, needles, and slide. Each component plays a specific role in regulating the amount of fuel and air entering the engine. By adjusting the jets, you can control the fuel flow, which directly impacts the bike’s performance.
The fuel-to-air mixture is significant as it determines how efficiently the engine burns the fuel. If the mixture is too rich (excessive fuel), it can lead to poor performance, spark plug fouling, and excessive exhaust smoke. On the other hand, if the mixture is too lean (insufficient fuel), it may cause engine overheating and potential damage.
Recognizing the symptoms of improper jetting is essential for troubleshooting. Issues like hesitation or bogging, loss of power, backfiring, and excessive exhaust heat are common indications of incorrect jetting. By understanding these symptoms, you can identify when your dirt bike requires jetting adjustments.
Step-By-Step Jetting Process
Preparing the dirt bike for jetting:
- Essential tools required: Before starting the jetting process, gather the necessary tools, including wrenches, screwdrivers, and a jetting kit.
- Safety precautions to be followed: Ensure the dirt bike is on a stable surface, the engine is cool, and wear protective gear like gloves and goggles.
Adjusting the pilot jet:
- Locating the pilot jet: Find the location of the pilot jet on the carburetor, usually near the bottom.
- Determining the correct pilot jet size: Refer to the manufacturer’s specifications or consult a professional to determine the appropriate size for your dirt bike.
Step-by-step pilot jet adjustment process:
- Remove the pilot jet using the appropriate tool.
- Clean the jet with compressed air to ensure it is free from debris.
- Replace the old pilot jet with the new one, making sure it is securely tightened.
Tuning the main jet:
- Identifying the main jet: Locate the main jet on the carburetor, usually towards the top.
- Selecting the appropriate main jet size: Refer to jetting charts or seek professional advice to determine the correct main jet size for your dirt bike.
Detailed instructions for main jet adjustment:
- Remove the main jet using the appropriate tool.
- Clean the jet thoroughly to remove any blockages.
- Replace the old main jet with the new one, ensuring it is securely tightened.
Fine-tuning the air screw:
- Locating the air screw: Find the air screw on the carburetor, typically near the bottom or side.
- Understanding the air screw’s role in jetting: The air screw determines the amount of air mixed with the fuel, impacting the fuel-to-air ratio.
Adjusting the air screw for optimal fuel-to-air mixture:
- Start the dirt bike and let it idle.
- Turn the air screw clockwise or counterclockwise to achieve the smoothest and most stable idle.
- Ensure proper idle speed:
Importance of idle speed in jetting:
Proper idle speed contributes to smooth engine performance and prevents stalls or rough idling.
Methods to adjust idle speed accurately:
- Locate the idle speed adjustment screw on the carburetor.
- Turn the screw clockwise to increase idle speed and counterclockwise to decrease it.
Troubleshooting Common Jetting Issues
Identifying signs of a lean-running dirt bike can help determine the necessary adjustments to rectify the issue. Some common symptoms include a high-pitched whining sound from the engine, engine sputtering or backfiring, and reduced power and acceleration. To resolve lean conditions, there are a few techniques you can employ. Firstly, you can enrich the fuel mixture by increasing the size of the main jet or adjusting the needle position. Additionally, checking for air leaks in the intake system and ensuring the air filter is clean and properly installed can also help improve fuel mixture.
Recognizing indications of a rich-running dirt bike is essential for troubleshooting. Common symptoms include black smoke coming from the exhaust, fouled spark plugs, and decreased fuel efficiency. To address rich conditions, you can adjust the fuel mixture by decreasing the main jet size or lowering the needle position. Moreover, ensuring the carburetor is clean and free from debris can also contribute to a correct fuel mixture. By familiarizing yourself with these lean and rich-running symptoms and their respective solutions, you can effectively jet your dirt bike and optimize its performance.
Advanced Jetting Techniques
Understanding the impact of altitude on a dirt bike’s jetting is crucial for optimal performance. Adjusting the jetting for altitude changes involves specific procedures. At high altitudes, where air density decreases, **leaner jetting** is required to compensate for the reduced oxygen levels. Conversely, at low altitudes, where air density increases, **richer jetting** is needed to ensure proper fuel-air mixture.
Jetting for temperature variations is also essential. Temperature affects air density, which influences jetting requirements. In hot climates, air is less dense, so **leaner jetting** is necessary. On the other hand, cold climates require **richer jetting** due to higher air density.
When modifying a dirt bike, the jetting should be optimized for enhanced performance. Modifications can impact jetting requirements, and adjustments may be needed to accommodate the changes. Performance jetting involves fine-tuning the fuel-air mixture to maximize power output.
Maintaining Proper Jetting
Maintaining proper jetting is crucial for the performance of your dirt bike. Regular jetting inspections are essential to ensure optimal functioning. Periodic checks allow you to identify any signs indicating the need for jetting adjustments. Some common indicators include rough idling, bogging down, or a loss of power. By regularly examining the jetting, you can prevent potential damage to your bike.
To maintain optimal jetting conditions, there are a few best practices to follow. Firstly, always use the manufacturer’s recommended fuel-to-oil ratio. Secondly, regularly clean and inspect your air filter for any blockage. Additionally, make sure to use the correct spark plug and periodically check its condition.
When adjusting the jetting, it’s crucial to follow the manufacturer’s guidelines. Start by making small adjustments and test the bike’s performance after each change. This careful approach will help you find the optimal jetting settings for your bike and preserve its performance.
While maintaining your dirt bike’s jetting, it’s important to avoid some common mistakes. These include improper carburetor cleaning, using the wrong jet size, or neglecting to tune the bike for different weather conditions. By avoiding these errors and following the best practices, you’ll ensure smooth operation and enhance the lifespan of your dirt bike.
Frequently Asked Questions Of How To Jet A Dirt Bike
How Do You Jet A Dirt Bike?
To jet a dirt bike, you need to adjust the fuel-to-air mixture in the carburetor to optimize performance. This involves changing the size of the main jet and pilot jet based on altitude, temperature, and riding conditions. Refer to your bike’s manual or consult a mechanic for specific instructions.
What Is The Purpose Of Jetting A Dirt Bike?
Jetting a dirt bike is essential for optimal engine performance. By adjusting the carburetor jets, you can ensure the engine receives the correct fuel-to-air ratio, improving throttle response, power delivery, and overall performance.
How Can I Tell If My Dirt Bike Needs To Be Jetted?
If your dirt bike exhibits symptoms like running too lean (engine revs high, sputtering), running too rich (poor throttle response, excessive smoke), or experiencing difficulty starting, it may need to be jetted. Consult your bike’s manual or a professional for proper diagnosis and adjustment.
Conclusion
To wrap it up, jetting a dirt bike is a crucial step in optimizing its performance. By adjusting the fuel and air mixture, you can ensure smooth acceleration, improved throttle response, and better overall power delivery. Remember to carefully read the spark plug and exhaust pipe to determine if the jetting needs any tweaking.
With the right jetting, your dirt bike will be running at its best, ready to conquer any terrain. Keep practicing and experimenting until you find the perfect balance for your riding style. Happy trails!