To clean a 2 or 4 stroke dirt bike carb, follow these steps precisely. First, remove the carburetor from the bike.
Next, disassemble the carburetor, taking note of the order of parts. Use a carburetor cleaner to thoroughly clean each part, paying special attention to the jets and passages. Reassemble the carburetor, ensuring all parts are placed back in their correct positions.
Finally, reinstall the carburetor onto the dirt bike.

Credit: www.youtube.com
How to Clean a 2 Or 4 Stroke Dirt Bike Carb: 8 Steps Guide
Preparing For Carb Cleaning
When it comes to cleaning a 2 or 4 stroke dirt bike carb, it is essential to start by preparing for the cleaning process. First, gather the necessary tools and materials, such as a carburetor cleaning solution, a soft brush, compressed air, and safety goggles. Make sure to choose a well-ventilated workspace to avoid inhaling any harmful fumes during the cleaning process.
It’s also important to take safety precautions, such as wearing gloves to protect your hands and ensuring that the dirt bike is turned off and cooled down before starting the cleaning process. Following these guidelines will help ensure a successful and safe carb cleaning for your dirt bike.
Removing The Carburetor
Removing the carburetor is an essential step in cleaning a 2 or 4-stroke dirt bike carb. To start, you need to locate the carburetor on your dirt bike. Look for it near the engine, usually attached to the intake manifold. Once located, **disconnect the necessary cables and hoses** that are connected to the carburetor. Take note of how they are positioned before removing them to ensure proper reassembly later. Next, carefully remove the carburetor from the bike, ensuring not to damage any surrounding parts.
This may require unfastening any bolts or screws holding it in place. Once removed, you can proceed with cleaning the carburetor thoroughly to rid it of any dirt, grime, or residue that may be hindering its performance. Reinstall the carburetor after cleaning, making sure to reconnect the cables and hoses properly and securely. This process will help ensure your dirt bike carb functions optimally and delivers peak performance.
Disassembling The Carburetor
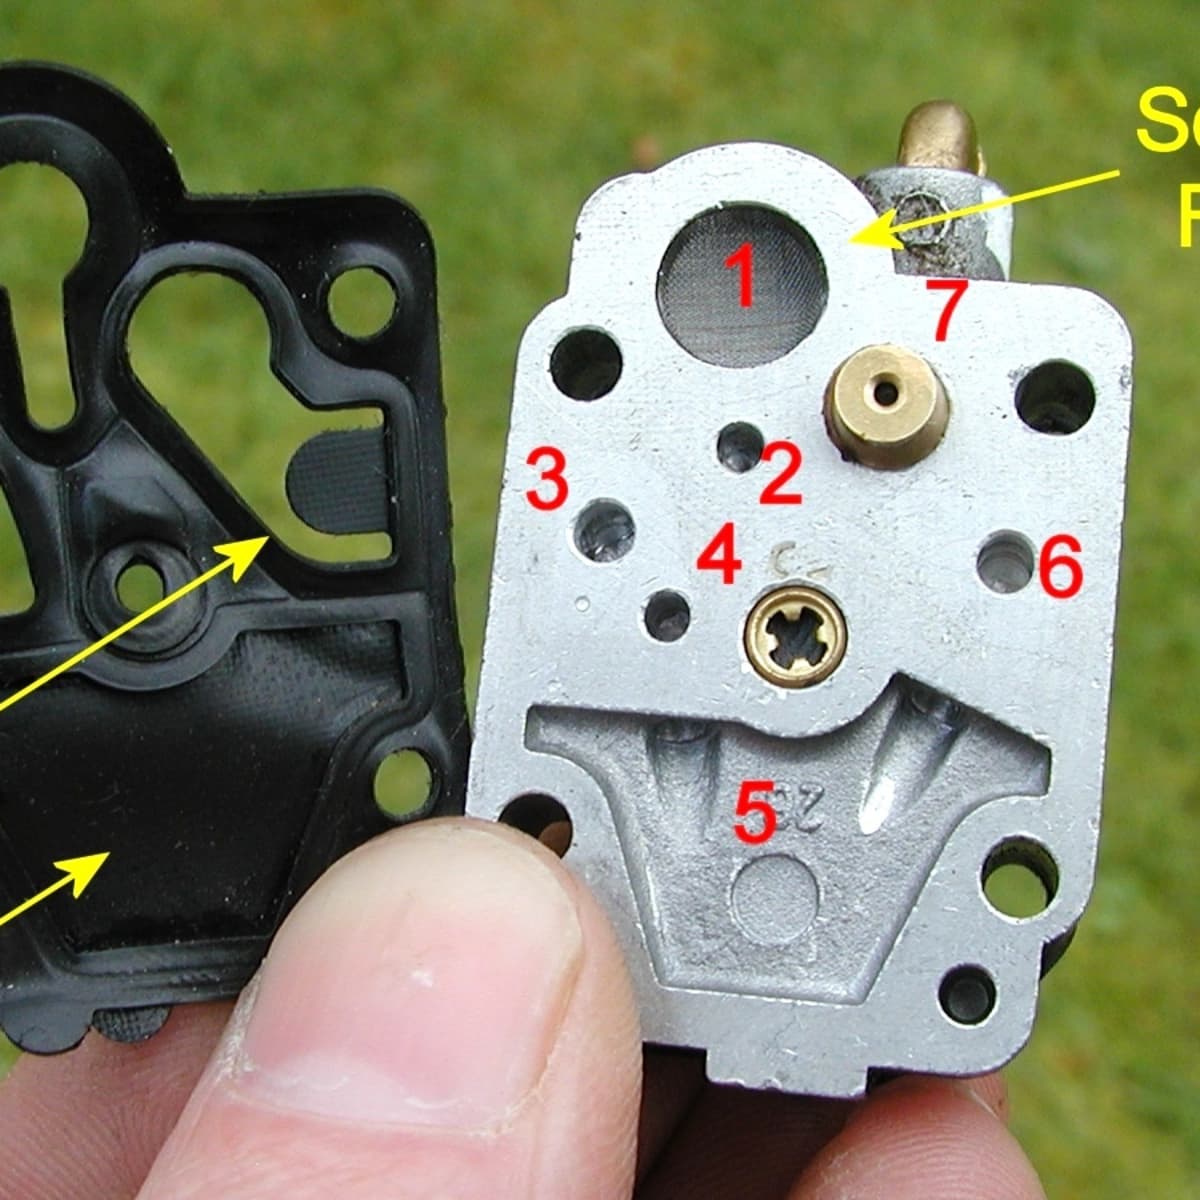
Disassembling the carburetor is a crucial step in cleaning a 2 or 4 stroke dirt bike carb. Start by removing the float bowl to drain any remaining fuel. Next, carefully take apart the various components of the carburetor, making sure to keep track of each part. It is helpful to organize and label the parts for easy reassembly later.
Taking precautions to handle the components gently and avoid misplacing anything is essential. By disassembling the carburetor properly, you will be able to thoroughly clean each part and ensure optimal performance of your dirt bike.
Cleaning The Carburetor Components
When it comes to cleaning the carburetor components of your 2 or 4 stroke dirt bike, using a carburetor cleaner spray can be highly effective. It allows you to clean the jets, passages, and other small parts with ease. Start by removing the carburetor from your dirt bike and disassembling it carefully. Then, spray the carburetor cleaner directly onto the parts that need cleaning, ensuring to coat them thoroughly.
Let the cleaner sit for a few minutes to break down any built-up debris and residue. Afterward, use a brush or a toothbrush to gently scrub the parts, making sure to clean out all the crevices. Finally, rinse the parts with clean water and allow them to dry completely before reassembling the carburetor. This process will ensure that your dirt bike carburetor is clean and functioning optimally.
Soaking And Brushing The Carburetor Parts
When cleaning a 2 or 4 stroke dirt bike carburetor, one essential step is soaking and brushing the carburetor parts for a thorough clean. To prepare a carburetor cleaning solution, you can use a mixture of warm water and a carb cleaner or solvent. This solution helps to break down any accumulated dirt, grime, or fuel deposits in the carburetor parts.
Next, soaking the components in the cleaning solution allows the solution to penetrate deeply and loosen any stubborn dirt or build-up. While soaking, it’s important to occasionally agitate the parts to further dislodge the debris. After a sufficient soaking time, removing the components and using a small brush can help scrub away any remaining dirt or deposits that have loosened up.
This process ensures that the carburetor parts are thoroughly cleaned, promoting optimal performance and fuel efficiency for your dirt bike. Remember to rinse the parts thoroughly and allow them to dry completely before reassembling the carburetor.
Inspecting And Reassembling The Carburetor
Inspecting and reassembling the carburetor is an essential part of cleaning a 2 or 4 stroke dirt bike carb. Firstly, **inspect** all the parts for any damage or wear. Look for **cracks**, **wear**, or any signs of **corrosion**. If any parts are damaged, they should be replaced to ensure optimal performance.
Next, it’s time to reassemble the carburetor. Start by using the labeled parts to guide you through the process. **Match** each component to its corresponding location, ensuring that you have the correct parts for your bike model.
As you reassemble, **prioritize** proper fit and **tightening**. Ensure that all components fit properly into place without any force or misalignment. Use the appropriate tools and techniques to tighten each component to the recommended specifications. This will help avoid any future issues.
Reinstalling The Carburetor
When reinstalling the carburetor onto a dirt bike, it is important to follow a few steps to ensure a proper and secure attachment. Begin by attaching the carburetor back onto the bike, aligning it with the mounting studs or bolts. Use the appropriate tool to tighten the nuts or bolts securely.
Next, reconnect the necessary cables and hoses that connect to the carburetor. Ensure that each connection is properly fastened and tightened to avoid any air or fuel leakages. Take a moment to double-check all connections to ensure that nothing is loose.
By following these steps, you will be able to reinstall the carburetor onto your dirt bike correctly, ensuring optimal performance and functionality.
Testing And Tuning The Carburetor
When cleaning a 2 or 4 stroke dirt bike carburetor, it’s crucial to properly test and tune it for optimal performance. Start by starting the dirt bike and allowing it to idle. This helps to warm up the engine and prepare it for adjustment. Next, adjust the idle speed and air-fuel mixture if necessary. The idle speed determines how fast the engine runs when it’s not being throttled. On the other hand, the air-fuel mixture affects the combustion process and overall power delivery.
Make sure to carefully adjust both to ensure smooth operation. Once the adjustments are made, it’s important to take the dirt bike for a test ride to ensure proper performance. This allows you to evaluate the carburetor’s settings and make any necessary fine-tuning adjustments. By following these steps, you can effectively clean and optimize the carburetor of your 2 or 4 stroke dirt bike.
Troubleshooting Common Carburetor Issues
| Identifying potential problems with carburetor performance | ||
|
When it comes to maintaining the performance of your dirt bike, the carburetor plays a crucial role. However, if you encounter any issues with the carburetor, it’s important to troubleshoot and address them promptly. One common problem is clogged jets, which can result in poor fuel flow and decreased performance. To fix this, you can clean the jets using a carburetor cleaner. Another issue to watch out for is a sticking float, which can cause fuel overflow or inadequate fuel supply. Ensuring the float moves freely and adjusting its level can resolve this problem. Additionally, to prevent future carburetor problems, regularly inspect and clean the carburetor, and use clean fuel without any impurities. Proper maintenance goes a long way in keeping your dirt bike running smoothly. |
Maintenance Tips For Keeping The Carburetor Clean
Regularly inspect and clean the carburetor to ensure the smooth functioning of your 2 or 4 stroke dirt bike. Over time, dirt, debris, and fuel residue can accumulate inside the carburetor, leading to poor performance. Use fuel additives to prevent buildup and clogs in the carburetor. These additives help to clean the fuel system and keep it free from deposits.
Additionally, storing the dirt bike properly is crucial to avoid carburetor issues. Store it in a cool, dry place away from direct sunlight and extreme temperatures. Taking these maintenance tips into consideration will keep your dirt bike’s carburetor clean and help optimize its performance.
Frequently Asked Questions On How To Clean A 2 Or 4 Stroke Dirt Bike Carb
How Often Should I Clean My Dirt Bike Carburetor?
You should clean your dirt bike carburetor at least once every riding season or every 15-20 hours of use. Regular cleaning ensures optimal performance and prevents clogs and build-up that can affect fuel flow.
What Tools Do I Need To Clean A Dirt Bike Carburetor?
To clean your dirt bike carburetor, you will need a screwdriver set, carburetor cleaner spray, compressed air, soft-bristle brushes, and a clean towel. These tools will help you disassemble, clean, and reassemble the carburetor effectively.
What Are The Signs That My Dirt Bike Carburetor Needs Cleaning?
Some signs that indicate your dirt bike carburetor needs cleaning include difficulty starting the bike, rough idling, poor acceleration, misfiring, and black smoke from the exhaust. If you notice any of these issues, it’s time to clean your carburetor for optimal performance.
Conclusion
Keeping your dirt bike carburetor clean is essential for optimal performance. Regular maintenance and cleaning can prevent clogs, improve fuel efficiency, and extend the lifespan of your bike. By following the step-by-step process outlined you can confidently clean the carburetor of your 2 or 4 stroke dirt bike.
Remember to use the appropriate cleaning tools and take your time to ensure a thorough job. Maintaining a clean carburetor will help you enjoy a smooth and trouble-free riding experience.