
To stud a dirt bike tire, use a stud gun to insert studs into the tire tread, ensuring they are evenly spaced and securely embedded. A properly studded dirt bike tire can provide increased traction on icy or slippery terrain, making it an essential modification for riders who frequently encounter challenging off-road conditions.
By following a few simple steps, you can stud your dirt bike tire effectively and enjoy improved grip and control during your rides. In this guide, we will walk you through the process of studding your dirt bike tire, providing you with the necessary information to tackle this task with confidence.
So, let’s dive in and learn how to stud a dirt bike tire efficiently and effectively!
Credit: riderswestmag.com
Why Stud Your Dirt Bike Tire
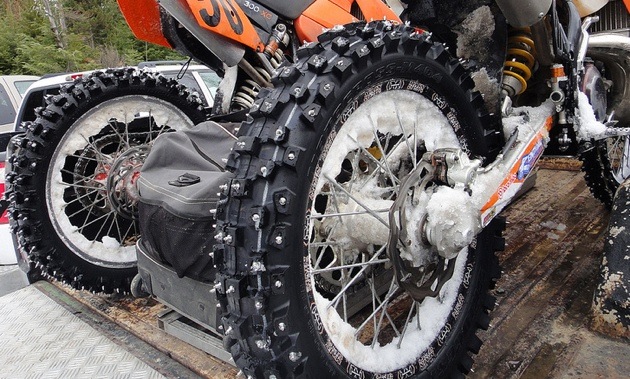
Studding your dirt bike tire is a great way to enhance your riding experience, especially on icy or snowy terrain. By adding studs to your tire, you can increase traction and enjoy a safer ride in slippery conditions. This can be particularly helpful during winter months or in areas with unpredictable weather.
Studded tires provide improved stability on icy surfaces, allowing you to maintain control and avoid accidents. With enhanced grip, you’ll have more confidence while riding, even when faced with challenging conditions.
One of the major advantages of studding your dirt bike tire is the ability to extend your riding season. With the added traction and stability, you can continue riding when others might be forced to store their bikes away due to inclement weather. This not only extends your enjoyment but also allows you to improve your skills in different conditions.
Tools And Materials Needed
To stud a dirt bike tire, you will need a few tools and materials. The tire studs are essential for providing better traction and control on slippery surfaces. Here are the items you will need:
| Tire studs | Stud installation tool |
| Drill | Hammer |
| Pliers | Screwdriver |
These tools will help you securely attach the studs to the tire’s tread. Start by positioning the tire studs evenly along the tire’s surface, ensuring they are facing in the right direction. Then, use the stud installation tool to insert the studs into the tire’s tread. A drill can be helpful in creating pilot holes for easier installation. Once the studs are in place, use a hammer, pliers, or screwdriver to secure them firmly. Remember to follow the instructions provided by the tire stud manufacturer for the best results.
How to Stud a Dirt Bike Tire: Step-By-Step Guide
Step 1: Deflate the tire
Using a valve core tool, remove the valve core to deflate the tire. This step helps in making the stud installation process easier.
Step 2: Clean the surface
Clean the tire surface thoroughly to remove any dirt, grease, or debris. This will ensure proper adhesion of the studs to the tire.
Step 3: Mark stud placement
Using a marker, mark the desired placement of the studs on the tire. It is recommended to evenly distribute the studs for consistent performance.
Step 4: Select appropriate stud size
Choose the right stud size based on the type of dirt bike and the intended riding conditions. Refer to the manufacturer’s guidelines for the recommended stud size.
Step 5: Insert studs into pre-marked holes
Using a stud insertion tool, insert the studs into the pre-marked holes on the tire. Apply gentle pressure to ensure proper insertion without damaging the tire.
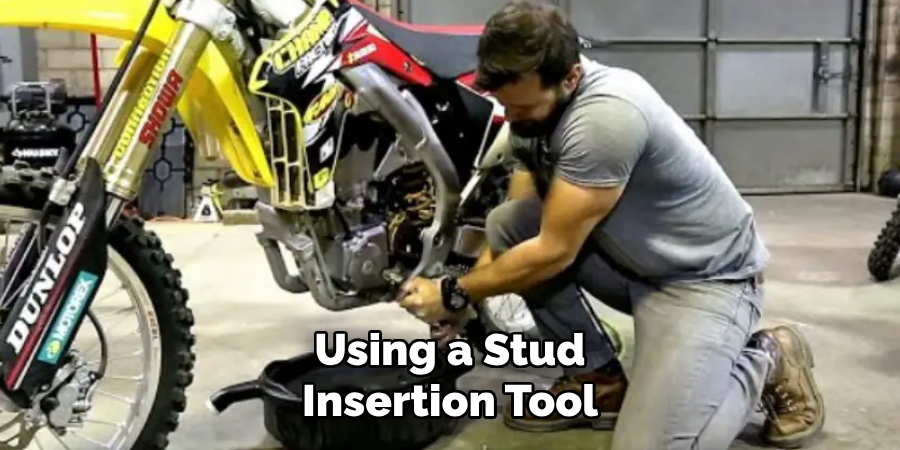
Step 6: Secure studs with a stud installation tool
With the studs in place, use a stud installation tool to secure them tightly onto the tire surface. This will prevent the studs from coming off during riding.
Step 7: Check stud alignment
Verify the alignment of the studs to ensure they are uniformly positioned on the tire. Make any necessary adjustments to maintain a balanced placement.
Step 8: Trim any excess stud length
If there are any studs protruding beyond the tire surface, use a stud trimming tool to carefully trim them down. This will prevent interference with the bike’s performance.
Step 9: Inflate the tire
Finally, use an air compressor to inflate the tire to the recommended pressure levels. Double-check the stud placement and make any last-minute adjustments if needed.
Tips And Safety Precautions
When it comes to stud the tire of your dirt bike, there are a few tips and safety precautions that you should keep in mind. First and foremost, it is important to wear safety goggles and work gloves to protect yourself from any potential injuries. Secondly, applying lubricant to the studs before installation can make the process easier and more efficient.
However, it is crucial to avoid over-tightening the studs as this can lead to damage and affect the performance of your bike. Taking these precautions will help ensure a smooth and safe installation of studs on your dirt bike tire.
Maintenance And Removal
Inspecting your dirt bike tire studs periodically is essential to ensure optimal performance and safety. Look out for any damaged or missing studs, as they can affect your bike’s traction and stability. When you spot any issues, promptly replace them to maintain peak performance.
To remove the studs from your dirt bike tire, follow these steps:
- Start by deflating the tire completely.
- Using pliers or a stud removal tool, carefully grip each stud and twist it counterclockwise.
- Continue this process until all the studs are removed.
- Inspect the tire for any remaining debris or adhesive after removing the studs.
- Clean the tire surface using a suitable cleaner to remove any residue.
- If you plan to re-stud the tire, make sure to clean and roughen the tread surface before installing the new studs.
Frequently Asked Questions On How To Stud A Dirt Bike Tire
How Often Should I Stud My Dirt Bike Tire?
It is recommended to stud your dirt bike tire before the winter season or when riding on icy surfaces. However, the frequency depends on your riding conditions and personal preference. Regular inspection of the tire tread depth can help determine when to stud your tire.
What Are The Benefits Of Studding My Dirt Bike Tire?
Studding your dirt bike tire provides increased traction on icy or snowy terrains, allowing for improved control and reduced slipping. This can greatly enhance safety and stability during winter rides or on slippery surfaces. Studded tires also provide better braking performance, making them essential for winter riding.

Can I Stud Any Tire For My Dirt Bike?
Not all tires are suitable for studding. It is important to choose a tire that has sufficient tread depth and clearance between the knobs to accommodate studs. Additionally, make sure the tire has a durable casing that can withstand the installation process and the stress of riding with studs.
Always consult the tire manufacturer’s recommendations before studding.
How Many Studs Should I Install On My Dirt Bike Tire?
The number of studs to install on your dirt bike tire depends on various factors like riding conditions, personal preference, and tire size. Typically, a good starting point is to install stud patterns with at least 150 to 200 studs on each tire.
Adjust the stud count based on your specific needs and the level of traction required.
Conclusion
To sum it up, studing a dirt bike tire is a valuable skill that can greatly enhance your off-road riding experience. By following the step-by-step process mentioned in this guide, you’ll be able to improve traction and stability on various terrains.
Remember to choose the right studs, install them correctly, and regularly maintain them for optimal performance. Get ready to conquer new challenges with confidence and take your dirt biking adventures to a whole new level. Happy riding!