To clean an oil filter, remove it from the vehicle and use a specialized cleaning solvent to rinse away oil and debris buildup.

Credit: m.youtube.com
Why Regularly Cleaning Your Oil Filter Is Important
Regularly cleaning your oil filter is crucial for the overall health and performance of your engine. By removing impurities and contaminants, you can prevent potential engine damage. The oil filter plays a key role in trapping dirt, debris, and metal particles that can accumulate over time.
This buildup can restrict the flow of oil and hinder the lubrication process, causing excessive wear and tear on engine components. Consistent cleaning not only improves engine performance, but it also extends the lifespan of your vehicle. By ensuring a clean oil filter, you are allowing oil to flow freely, maintaining proper lubrication, and reducing the risk of engine malfunctions. Remember to follow the recommended maintenance schedule for your specific vehicle to keep your oil filter in optimal condition.
Tools And Materials Needed For Cleaning Your Oil Filter
| Tools and Materials Needed for Cleaning Your Oil Filter |
|---|
| –Screwdriver: Essential for removing the oil filter cap or cover. Make sure to use the correct size to avoid damaging the filter. –Safety gloves: Protect your hands from any dirt, grime, or chemicals while handling the filter. –Cleaning solvent: Choose a solvent specifically designed for oil filter cleaning. It effectively removes accumulated debris and oil. –Bucket or container: A container with a leak-proof lid is needed to soak the filter in the cleaning solvent. –Soft brush: Use a brush with bristles that won’t damage the filter while scrubbing away dirt and oil residue. |
How to Clean Oil Filter: 7 Steps Guide
Step 1: Know Your Vehicle’S Oil Filter Location
To properly clean your oil filter, the first step is to identify its location in your vehicle. You can refer to your vehicle’s manual or search online for resources that can provide information about the oil filter’s position. This is an important step because the oil filter can be located in different areas depending on the make and model of your vehicle.
Once you have determined the location of the oil filter, you can proceed with the cleaning process. It is important to note that cleaning the oil filter should be done carefully to ensure its effectiveness in filtering contaminants from the engine oil. You can follow the manufacturer’s instructions or refer to a trusted resource for detailed guidance on how to clean your specific oil filter.
Cleaning the oil filter regularly is essential for maintaining the overall health and performance of your vehicle’s engine. By removing any accumulated debris or contaminants, you can prolong the lifespan of your engine and ensure smooth operation.
Step 2: Preparation And Safety Measures
Park the vehicle on a flat surface. Wear safety gloves to protect your hands. Cleaning an oil filter effectively requires proper preparation and safety measures to avoid any accidents or injuries. Parking the vehicle on a flat surface ensures stability and prevents it from rolling or moving while you work on the oil filter.
This will help you maintain a safe working environment. Additionally, wearing safety gloves is essential to protect your hands from any potential harm, such as sharp edges or contact with hazardous substances. Safety should always be a top priority when performing any maintenance tasks on your vehicle.
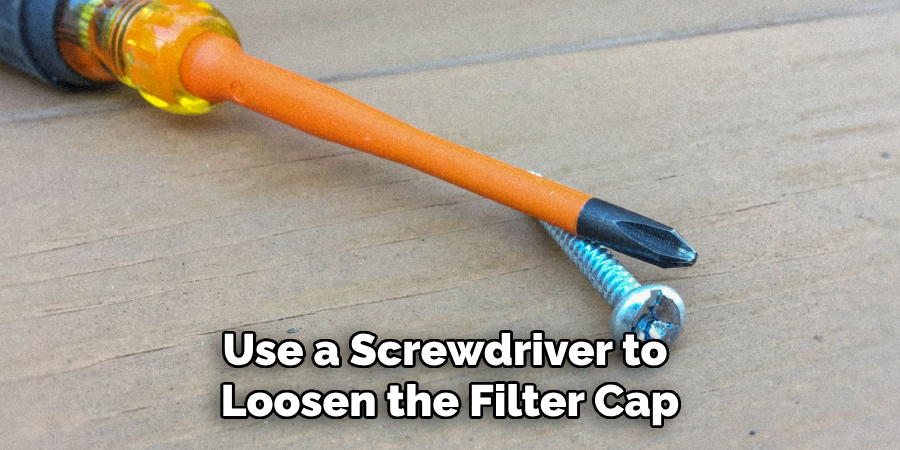
Step 3: Removing The Oil Filter
When it comes to cleaning an oil filter, it’s important to follow the correct steps. In this blog post, we will discuss step 3: removing the oil filter.
| Subheading |
|---|
| Locate the oil filter |
| Use a screwdriver to loosen the filter cap or housing |
Locating the oil filter is the first step in removing it. The oil filter can usually be found close to the engine, either on the side or underneath. Once located, make sure to have a drain pan ready to catch any oil that may spill.
Next, use a screwdriver to loosen the filter cap or housing. This allows for easier removal of the oil filter. Be careful not to damage the filter or surrounding components while doing this. Once the cap or housing is loose, it can be unscrewed by hand or using an appropriate tool.
By following these steps, you can successfully remove the oil filter and proceed with cleaning or replacing it as necessary. Remember to dispose of the old filter properly and refill the engine with fresh oil before starting your vehicle again.
Step 4: Preparing The Filter For Cleaning
When cleaning an oil filter, it is important to prepare it properly before beginning the cleaning process. This involves emptying the old oil from the filter and inspecting it for any visible debris. To empty the old oil, you can either drain it out or carefully remove the old filter and pour the oil into a container. Once the old oil is removed, closely examine the filter for any visible debris such as dirt or metal particles. This step is crucial as it helps ensure that the filter is ready for cleaning and prevents any contamination in the cleaning process.
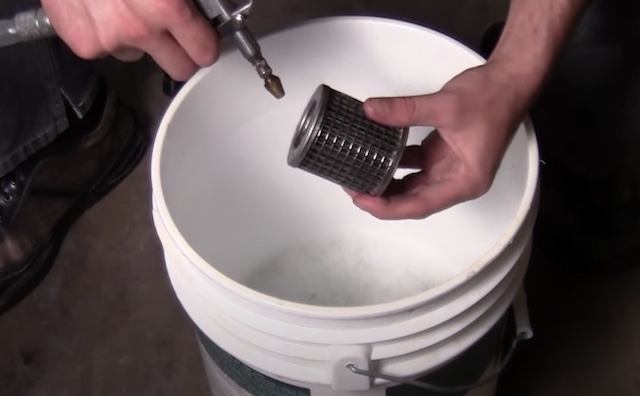
Step 5: Cleaning The Oil Filter
Fill a container or bucket with a cleaning solvent. Submerge the filter in the solvent and let it soak. Use a soft brush to remove dirt and debris. Rinse the filter with water and let it dry completely.
Step 6: Reinstalling The Oil Filter
To properly clean an oil filter, it is crucial to follow the correct steps. Once you have reached step 6, reinstalling the oil filter, there are a few important guidelines to keep in mind. Firstly, apply a **thin layer of oil** to the **rubber gasket** of the new filter. This will ensure a proper seal and prevent oil leaks.
Then, securely **screw the new oil filter into place**. It is important to tighten it firmly, but be careful not to overtighten, as this could damage the filter or the engine. Following these steps will help maintain the proper functioning of your oil filter, ensuring the longevity of your engine.
Step 7: Checking For Leaks And Testing
Start the engine and carefully check for any signs of oil leakage. Inspect the oil filter and surrounding areas for any drips or drops. It is important to ensure that there are no leaks, as leaky filters can cause engine damage and potential oil loss.
While the engine is running, monitor the oil pressure and engine performance. A stable oil pressure reading is crucial for proper engine function. Keep an eye on the gauge or refer to your vehicle’s dashboard for any indications of low or erratic oil pressure.
If you notice any abnormal oil leakage or fluctuations in oil pressure, it is recommended to immediately turn off the engine and address the issue. Consult a professional mechanic or refer to your vehicle’s manual for troubleshooting steps or further guidance.
Frequency Of Oil Filter Cleaning
The frequency of cleaning your oil filter depends on various factors such as driving conditions and the quality of oil used. It is important to regularly maintain and clean your oil filter to ensure the efficient functioning of your vehicle. Proper maintenance can extend the lifespan of your filter and prevent potential engine damage.
Here are some general guidelines to follow for regular oil filter cleaning:
| Factors | Cleaning Frequency |
| Normal Driving Conditions | Every 3,000 to 5,000 miles |
| Severe Driving Conditions (dusty roads, stop-and-go traffic) | Every 1,500 to 3,000 miles |
| Off-Road or Heavy Towing | Every 1,000 to 2,000 miles |
| Oil Quality | Check the manufacturer’s recommendations for oil change intervals |
In addition to these guidelines, it’s important to visually inspect your oil filter during each oil change to check for any signs of clogging or damage. If you notice excessive dirt or debris, it’s best to clean or replace the filter as necessary.
Remember, proper maintenance of your oil filter is crucial for the overall health and performance of your vehicle’s engine. Follow these guidelines to ensure clean and efficient oil filtration.
Frequently Asked Questions On How To Clean Oil Filter
How Often Should You Clean Your Oil Filter?
It is recommended to clean your oil filter every time you change your engine oil, which is typically every 3,000 to 5,000 miles. Regular cleaning will ensure optimal performance and prevent debris from clogging the filter.
What Tools Do You Need To Clean An Oil Filter?
To clean an oil filter, you will need a socket wrench, oil filter wrench, a drain pan, clean rags, and a container for used oil. These tools will help you remove the filter, drain the oil, and clean the filter thoroughly before reinstalling it.
How Do You Clean An Oil Filter?
To clean an oil filter, start by removing it from your vehicle using an oil filter wrench and a socket wrench. Once removed, carefully drain any excess oil from the filter and clean it using a degreaser and a clean cloth or brush.
Rinse thoroughly and allow it to dry completely before reinstalling.
Conclusion
Cleaning the oil filter is an essential maintenance task that ensures the smooth functioning and longevity of your vehicle’s engine. By following the steps outlined in this guide, you can easily clean your oil filter at home and save both time and money.
Regularly cleaning your oil filter will help improve engine performance and prevent potential damage caused by dirt and debris accumulation. Remember, a clean oil filter is a key to a healthy engine.