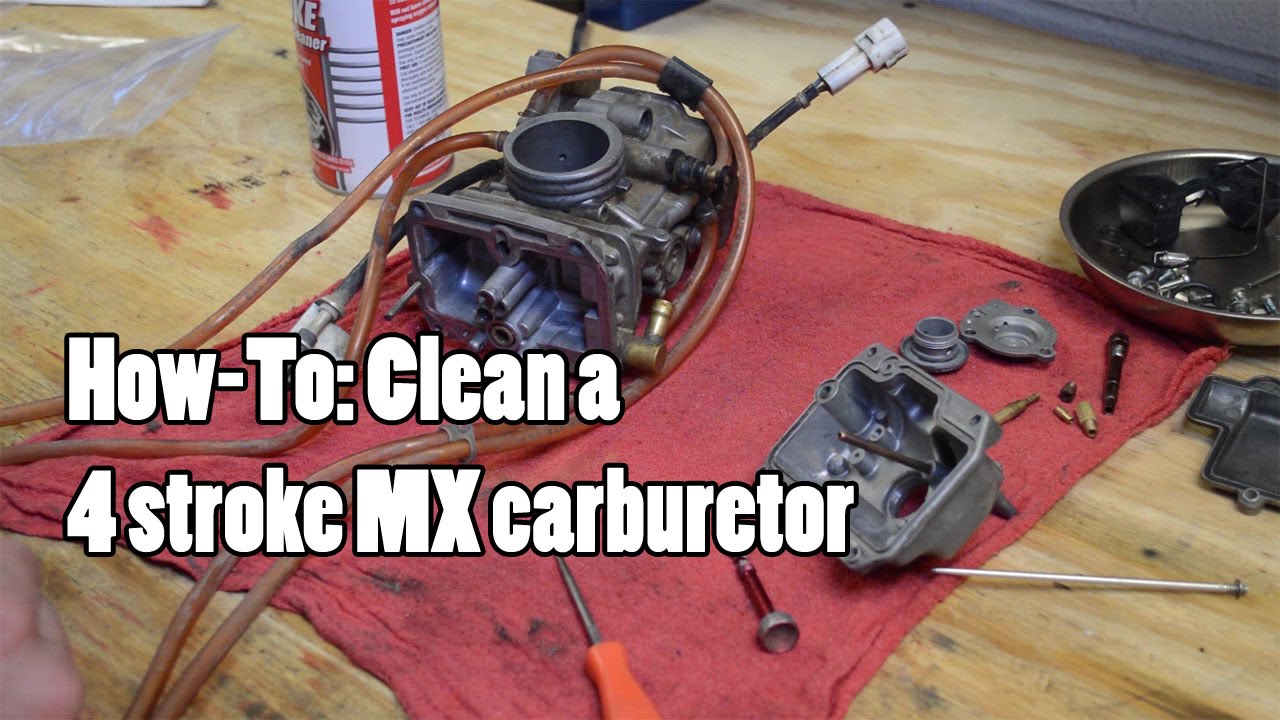
To clean a 4 stroke dirt bike carb, remove the carburetor, take it apart, clean it thoroughly, and reassemble it following the proper steps. Keeping your dirt bike’s carburetor clean is essential for optimal performance.
Over time, dirt, debris, and other contaminants can accumulate in the carburetor, affecting its functionality. Regular maintenance and cleaning of the carburetor can prevent issues such as poor fuel efficiency, reduced power, and rough idling. We will provide you with a step-by-step guide on how to clean a 4 stroke dirt bike carburetor.
By following these instructions carefully, you can ensure that your dirt bike’s carburetor remains clean, allowing your bike to run smoothly and efficiently. So let’s dive in and learn how to properly clean a 4 stroke dirt bike carburetor.
Credit: dengarden.com
Preparing The Necessary Tools And Supplies
Before you begin the process of cleaning your 4 stroke dirt bike carburetor, it is important to gather all the necessary tools and supplies. By having everything at hand, you can work more efficiently and ensure a thorough cleaning. In this section, we will discuss the tools and supplies you will need and why they are essential to the process.
Oil drain pan
A clean and safe working environment is crucial when working on your dirt bike. To prevent any oil spills and keep your workspace tidy, you will need an oil drain pan. This pan will collect any oil that may drip or spill during the cleaning process.
Cleaning solvent
A reliable cleaning solvent is a must-have item for cleaning your dirt bike carburetor. This solvent effectively removes any dirt, grime, and residue that may have accumulated over time. It is essential to pick a solvent that is specifically designed for carburetors to ensure the best results.
Carburetor cleaner
While a cleaning solvent is excellent for general cleaning, a carburetor cleaner is specifically formulated to tackle the tough deposits that can clog up your carburetor. Using a carburetor cleaner will help dissolve and remove any stubborn build-up, ensuring optimal performance.
Screwdriver set
A screwdriver set with various sizes and types of screwdrivers is essential when disassembling and reassembling your dirt bike carburetor. Different screws and components may require different screwdriver types and sizes, so having a set ensures you have the right tool for the job.
Soft brushes
To safely clean the delicate parts of your carburetor, soft brushes are a necessity. Choose brushes specifically designed for carburetor cleaning, as they have bristles that can effectively remove dirt and grime without causing damage.
Compressed air can
To remove any remaining debris or dirt from the carburetor’s tiny passages, a compressed air can or air compressor is essential. The powerful burst of air will help you dislodge particles that are difficult to reach with brushes, ensuring a thorough cleaning.
Safety goggles
Protecting your eyes is crucial when working with cleaning solvents and compressed air. Safety goggles will shield your eyes from any potential splashes, fumes, or debris that may come loose during the cleaning process. Never underestimate the importance of safety when working on your dirt bike.
Latex gloves
Wearing latex gloves throughout the cleaning process helps protect your hands from any harmful chemicals or residues that may be present. They also provide a better grip when handling small and slippery parts, ensuring your safety and preventing any accidental damage.
How to Clean a 4 Stroke Dirt Bike Carb: Step by Step Guide
Removing The Carburetor From The Dirt Bike
One of the most important steps in cleaning a 4-stroke dirt bike carburetor is removing the carburetor itself. This process requires careful attention and precision to ensure the carburetor is safely detached from the bike. In this section, we will go through the step-by-step process of removing the carburetor from your dirt bike.
Disconnect the Fuel Line
The first step in removing the carburetor is to disconnect the fuel line. This line is responsible for delivering fuel to the carburetor, and disconnecting it ensures that no fuel will leak out during the removal process. Locate the fuel line, usually connected to the bottom of the carburetor, and carefully loosen the clamp. Once loose, you can gently slide the fuel line off the carburetor, ensuring that it is completely detached.
Remove the Air Filter and Intake Manifold
Next, you’ll need to remove the air filter and intake manifold. These components are usually connected to the carburetor and should be removed before attempting to remove the carburetor itself. Start by removing any clamps or screws that secure the air filter and intake manifold to the carburetor. Once these are removed, you can carefully detach these components, making sure not to damage them in the process. Set them aside in a safe place.
Loosen and Remove the Carburetor Bolts
With the fuel line, air filter, and intake manifold detached, the next step is to loosen and remove the carburetor bolts. These bolts secure the carburetor to the engine block and must be carefully removed. Use an appropriate wrench or socket to loosen each bolt, ensuring that you don’t strip or damage them in the process. Once all the bolts are loosened, remove them completely and set them aside.
Carefully Detach the Carburetor from the Bike
Now that the bolts are removed, you can carefully detach the carburetor from the bike. Gently wiggle the carburetor to loosen it from its position and then pull it away from the engine block. Take caution not to force or twist the carburetor, as this can cause damage to both the carburetor and the bike. Once the carburetor is completely detached, inspect it for any signs of damage or wear.
By following these step-by-step guidelines, you can safely remove the carburetor from your 4-stroke dirt bike. This will allow you to proceed with the cleaning process and ensure your bike performs at its best. Stay tuned for the next section where we will cover how to properly clean the carburetor to maintain optimal performance.
Disassembling The Carburetor For Cleaning
Keeping your 4-stroke dirt bike carburetor clean is essential for optimal performance. Over time, dirt, debris, and old fuel can clog the carburetor, leading to poor fuel delivery and decreased engine performance. Disassembling and cleaning the carburetor is a necessary maintenance task that should be done regularly. In this section, we will guide you through the step-by-step process of disassembling the carburetor for cleaning so that you can keep your dirt bike running smoothly.
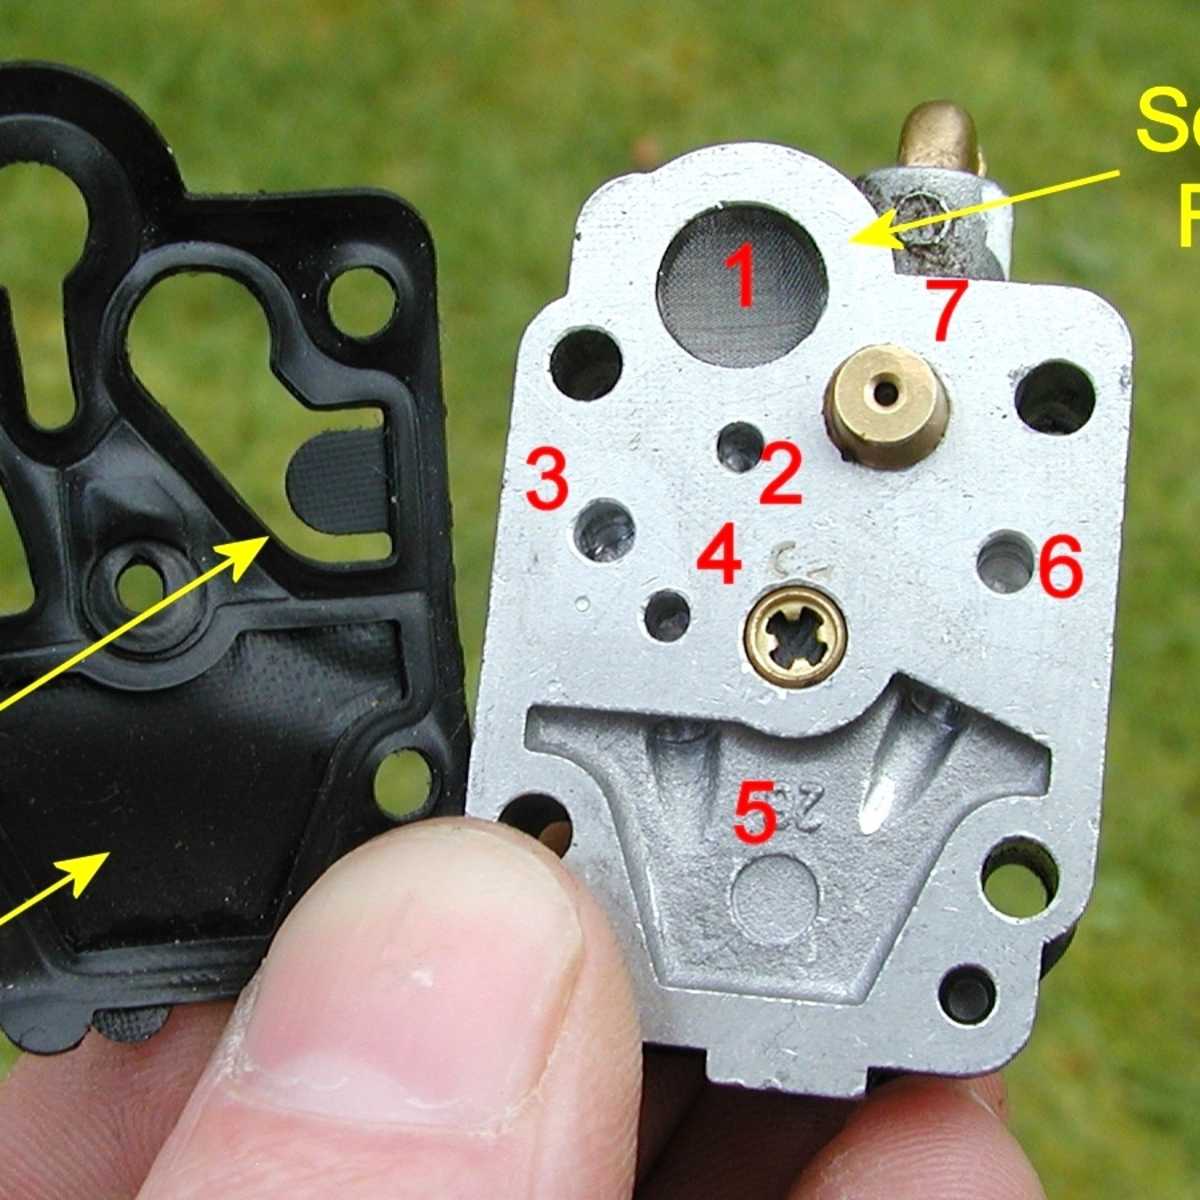
Identify the various components of the carburetor
Before you begin disassembling the carburetor, it is important to familiarize yourself with the various components. The carburetor is composed of several parts that work together to control the fuel-air mixture entering the engine. These parts include:
- Air filter: Filters the air before it enters the carburetor.
- Float bowl: Holds the fuel and houses the float mechanism.
- Main jet: Controls the flow of fuel at high speeds.
- Pilot jet: Controls the flow of fuel at low speeds and idle.
- Needle valve: Regulates the amount of fuel entering the engine.
Remove the float bowl
The first step in disassembling the carburetor is to remove the float bowl. The float bowl is located at the bottom of the carburetor and is held in place by screws. To remove the float bowl, follow these steps:
- Locate the screws securing the float bowl and carefully unscrew them using the appropriate screwdriver.
- Once the screws are removed, gently remove the float bowl, being cautious not to spill any fuel that may be trapped inside.
- Inspect the float bowl for any signs of dirt, debris, or residue. If necessary, clean the float bowl thoroughly using a carburetor cleaner and a soft brush or cloth.
Take note of the carburetor settings
Before completely disassembling the carburetor, it is crucial to take note of the current carburetor settings. These settings include the idle screw position, the mixture screw position, and any other adjustments that may have been made. Taking note of these settings ensures that you can easily restore the carburetor to its previous settings once you have finished cleaning it.
Remove the jets and needle valve
To further disassemble the carburetor for thorough cleaning, you will need to remove the jets and needle valve. The jets and needle valve can become clogged with residue and impede fuel flow. Follow these steps to remove them:
- Locate the main and pilot jets and carefully unscrew them using a jet removal tool or an appropriate-sized wrench.
- Once the jets are removed, inspect them for any signs of blockage or damage. Clean them with a carburetor cleaner and a small wire brush if necessary.
- Next, locate the needle valve and unscrew it using a screwdriver or needle-nose pliers.
- Inspect the needle valve for any debris or wear. Clean it thoroughly using a carburetor cleaner and a soft brush or cloth.
By following these steps and disassembling the carburetor for cleaning, you can ensure that your 4-stroke dirt bike will run smoothly and efficiently. Regularly cleaning the carburetor will keep your engine performing at its best and extend its lifespan. Stay tuned for the next section where we will guide you through the process of cleaning the carburetor components in detail.
Cleaning The Carburetor Components
Cleaning the carburetor components of your 4 stroke dirt bike is an essential maintenance task that should be done regularly. Over time, dirt and debris can accumulate in the carburetor, causing it to clog and affect the performance of your bike. To ensure that your dirt bike continues to run smoothly, it is important to clean the carburetor thoroughly. In this section, we will discuss the step-by-step process of cleaning the carburetor components, including soaking the carburetor parts in a cleaning solvent, using a soft brush to remove any debris or buildup, and cleaning the jets and needle valve with a carburetor cleaner.
**Soak the carburetor parts in a cleaning solvent**
The first step in cleaning the carburetor components is to soak the parts in a cleaning solvent. This helps to break down any dirt or grime that has accumulated in the carburetor. Fill a container with the cleaning solvent and place the carburetor parts in it. Make sure that all parts are fully submerged in the solvent.
**Use a soft brush to remove any debris or buildup**
After soaking the parts for a while, use a soft brush to remove any remaining debris or buildup. Gently scrub the parts to dislodge any dirt that may be stuck on them. Be careful not to use a brush with stiff bristles, as this can damage the delicate components of the carburetor.
**Clean the jets and needle valve with carburetor cleaner**
Next, it is important to clean the jets and needle valve of the carburetor. These components are responsible for regulating the fuel flow in the carburetor, so it is crucial to ensure they are clean and free from any obstructions. Use a carburetor cleaner specifically designed for this purpose and carefully spray it onto the jets and needle valve. This will help to dissolve any residue and ensure that they are clean and functioning properly.
**Ensure that all parts are thoroughly cleaned**
Finally, it is important to ensure that all parts of the carburetor are thoroughly cleaned before reassembling it. Check each component carefully to make sure that there is no debris or grime left behind. Rinse the parts with clean water to remove any remaining cleaning solvent. Once the parts are clean and dry, you can confidently reassemble the carburetor and reinstall it onto your dirt bike.
Cleaning the carburetor components of your 4 stroke dirt bike is an important task that should not be overlooked. By following the steps outlined above, you can ensure that your bike’s carburetor is clean and functioning properly, resulting in improved performance and a smoother ride. Regular cleaning and maintenance will keep your dirt bike running at its best for years to come.
Inspecting And Reassembling The Carburetor
Once you have successfully disassembled and cleaned the parts of your 4 stroke dirt bike carburetor, it’s time to move on to the next crucial steps – inspecting and reassembling the carburetor. This important phase ensures that all the components are in good condition and that the carburetor is properly reassembled for optimal performance. Here are the key steps to follow:
Examine the gaskets and seals for any damage
Before reassembling the carburetor, it is essential to carefully examine the gaskets and seals for any signs of damage or wear. Gaskets and seals play a vital role in preventing any air or fuel leaks, so it’s important to ensure they are in good condition. Inspect the gaskets and seals thoroughly, looking for any cracks, tears, or deformities. If you notice any damage, it’s crucial to replace them with new ones to maintain the efficiency of the carburetor.
Check the float height according to the manufacturer’s specifications
The float height is a critical adjustment that ensures the proper fuel level in the carburetor’s float bowl. Every dirt bike carburetor has a specific float height recommended by the manufacturer. To set the float height correctly, refer to the manufacturer’s specifications and use a small ruler or feeler gauge to measure it accurately. Make any necessary adjustments to ensure that the float height is within the recommended range. This step is essential for the carburetor to function properly and deliver the right amount of fuel to the engine.
Reassemble the carburetor in the reverse order
With the inspection and adjustments completed, it’s time to reassemble the carburetor. Start by referring to the pictures or notes you took during the disassembly process to ensure that all parts are put back in the correct order. Reassemble the carburetor step by step, following the reverse order of disassembly. Make sure to handle the parts with care and place them correctly to avoid any potential issues during reassembly.
Additionally, for best results, it is recommended to use the correct torque specifications for the bolts used in the carburetor. This will ensure that the bolts are tightened to the precise level, preventing any leaks or damage. Using a torque wrench, tighten the bolts according to the manufacturer’s recommended torque specifications. Be careful not to overtighten them, as it can lead to damage to the carburetor or the bolts themselves.
In conclusion
Inspecting and reassembling the carburetor is a crucial step in keeping your 4 stroke dirt bike running smoothly. By carefully examining the gaskets and seals, checking the float height according to the manufacturer’s specifications, and reassembling the carburetor in the reverse order with the correct torque specifications, you can ensure that your carburetor is working optimally and providing the right fuel-air mixture to your dirt bike’s engine.
Reinstalling The Carburetor Onto The Dirt Bike
Attach the carburetor back onto the bike
Once you have thoroughly cleaned and inspected the carburetor of your 4-stroke dirt bike, it’s time to reassemble and reinstall it onto the bike. Follow these steps to ensure a proper installation:
- Start by carefully positioning the carburetor onto the intake manifold. Make sure the carburetor is aligned properly with the mounting flange.
- Tighten the bolts or screws that secure the carburetor to the intake manifold. Take care not to overtighten, as this can damage the threads or cause air leaks.
- When tightening the screws, it’s best to do it in a crisscross pattern to ensure even pressure distribution. This will help prevent any warping or distortion of the carburetor.
- Double-check that the throttle cable is properly attached to the carburetor slide. Ensure it moves freely without any binding or sticking.
Reconnect the fuel line
Now that the carburetor is securely attached to the bike, it’s time to reconnect the fuel line. Follow these steps to ensure a proper reconnection:
- Locate the fuel line that was disconnected earlier and inspect it for any signs of damage or wear. If necessary, replace it with a new one for optimal performance and safety.
- Insert the fuel line onto the carburetor’s fuel inlet. Apply a small amount of lubricant, such as petroleum jelly, to ease the connection.
- Secure the fuel line onto the carburetor using a hose clamp. Make sure it is tight enough to prevent any fuel leaks, but not overly tight to avoid damaging the line or carburetor.
Check for any leaks or loose connections
Once the carburetor and fuel line are reconnected, it’s crucial to check for any leaks or loose connections. Follow these steps to ensure a proper inspection:
- Turn on the fuel valve and check for any fuel leaks around the carburetor and fuel line connection points. Pay attention to any signs of dripping or pooling fuel.
- If you notice any leaks, carefully tighten the connections or replace any damaged components.
- Inspect the throttle cable and ensure it moves smoothly without any binding or sticking. Adjust as necessary for optimal throttle response.
- Start the dirt bike and let it idle for a few minutes. Listen closely for any abnormal sounds or vibrations that may indicate a loose connection.
Replace the air filter and intake manifold
To complete the reinstallation process, you’ll need to replace the air filter and intake manifold. Follow these steps to ensure a proper replacement:
- Remove the old air filter and inspect it for any signs of damage or clogging. Replace it with a new one if necessary. A clean air filter is essential for optimal engine performance.
- Position the new air filter onto the intake manifold and secure it in place using the provided clips or fasteners.
- Inspect the intake manifold for any signs of wear or damage. If needed, replace it to ensure a proper seal between the carburetor and engine.
- Align the intake manifold with the mounting flange and secure it using the appropriate bolts or screws.
- Double-check that all connections, including the carburetor, fuel line, air filter, and intake manifold, are properly tightened and secured.
By following these steps, you can confidently reinstall the carburetor onto your 4-stroke dirt bike, ensuring proper function and performance. Remember to take your time and be attentive to detail during the process to avoid any future issues or complications.
Testing And Fine-Tuning The Carburetor
Start the dirt bike and let it idle
Before you begin the testing and fine-tuning process, start your 4 stroke dirt bike and let it idle for a few minutes. This will allow the engine to warm up and establish a baseline for further adjustments.
Adjust the idle speed screw if necessary
Check the idle speed of your dirt bike by listening to the engine and observing the RPMs. If the idle speed is too high or too low, you may need to adjust the idle speed screw. Locate the screw on the side of the carburetor and turn it clockwise to increase the idle speed or counterclockwise to decrease it. Make small adjustments at a time and listen to the engine to find the optimal idle speed.
Test the throttle response and acceleration
After setting the idle speed, it’s time to test the throttle response and acceleration of your dirt bike. Put on your helmet and safety gear, then twist the throttle and observe how quickly the engine responds. A smooth and immediate response indicates that the carburetor is functioning properly. If there is a delay or hesitation, it may be necessary to further adjust the carburetor settings.
Fine-tune the carburetor settings for optimal performance
To achieve optimal performance, it is important to fine-tune the carburetor settings of your 4 stroke dirt bike. Begin by adjusting the air and fuel mixture screws. Turn the screws in small increments, keeping track of the changes in engine performance. A richer mixture will result in increased power while a leaner mixture may improve fuel efficiency. Find the right balance that suits your riding style and terrain conditions.
Additionally, you can consider adjusting the needle position. Moving the needle clip up will richen the mixture at mid-throttle, while moving it down will lean the mixture. This adjustment can help optimize performance in the mid-range RPMs.
Once you have made the necessary adjustments, take your dirt bike for a test ride to evaluate its performance. Pay attention to how it accelerates, handles, and responds to the throttle at different RPMs. Fine-tuning the carburetor may require some trial and error, so be patient and make small adjustments as needed until you achieve the desired results.
Remember to document any changes you make and keep a record of the optimal settings for future reference. Regular maintenance and inspection of your carburetor will ensure that your 4 stroke dirt bike continues to operate at its best.
Proper Maintenance And Prevention Tips
Regularly clean and maintain the carburetor
Proper maintenance of your 4-stroke dirt bike’s carburetor is crucial to ensure smooth and efficient engine performance. Regularly cleaning and maintaining the carburetor helps remove any built-up dirt, debris, and sediment that can disrupt the fuel and air mixture, leading to poor combustion and decreased power.
Start by disconnecting the fuel line from the carburetor and carefully removing it from the bike. Use a screwdriver to remove the float bowl and inspect it for any signs of damage or corrosion. Clean the bowl thoroughly, making sure to remove any dirt and sediment.
Next, remove the pilot jet and main jet from the carburetor using a small jet wrench or a flat-tip screwdriver. Clean both jets carefully by spraying them with a carburetor cleaner or soaking them in a carburetor cleaning solution. Use a thin wire or a needle to clean any clogged passages in the jets.
Inspect the float needle and the float itself for any signs of wear or damage. Replace these components if necessary to maintain proper fuel flow. Once all the parts are clean and free of debris, reassemble the carburetor and reinstall it onto the bike.
Use high-quality fuel and air filters
The quality of the fuel and air entering your dirt bike’s engine can greatly impact its performance and lifespan. Using high-quality fuel ensures a clean and consistent burn, while a clean air filter prevents dust and debris from entering the engine.
When filling up your gas tank, choose a reputable gas station that sells high-quality fuel without any contaminants. Using low-quality gasoline or fuel that has been sitting in storage for too long can lead to fuel system problems, including clogged jets and poor engine performance.
Similarly, regularly inspect and clean or replace the air filter to ensure proper airflow. A clogged air filter restricts the amount of air entering the engine, leading to decreased power and potential engine damage. Follow the manufacturer’s instructions on how often to clean or replace the air filter, as this may vary depending on riding conditions and frequency.
Keep dirt and debris away from the intake
The intake system of your 4-stroke dirt bike, including the carburetor, can easily accumulate dirt, dust, and debris while riding off-road. These contaminants can find their way into the engine, causing damage and decreased performance.
To prevent this, make sure to regularly inspect and clean the intake system. Check for any loose or damaged components, such as intake hoses or clamps, and replace them if necessary. Additionally, consider installing an airbox cover or a pre-filter to provide extra protection against dirt and debris entering the intake system.
Follow the manufacturer’s recommended maintenance schedule
One of the most important steps in maintaining your 4-stroke dirt bike’s carburetor is following the manufacturer’s recommended maintenance schedule. Each bike may have specific maintenance intervals and procedures, so it’s crucial to consult the owner’s manual for detailed instructions.
The manufacturer’s recommended maintenance schedule often includes tasks such as carburetor cleaning, jet inspection, and adjustment, as well as overall bike inspection and tune-up. By adhering to these recommendations, you can ensure that your dirt bike carburetor remains in top condition, allowing for optimal engine performance and longevity.
Troubleshooting Common Carburetor Issues
Poor idle or stalling
If your 4-stroke dirt bike carburetor is experiencing poor idle or stalling issues, there are a few common culprits you should consider. First, check for any obstructions or blockages in the fuel line or fuel filter. Dirt and debris can easily accumulate in these areas, preventing the proper flow of fuel to the carburetor.
Ensure that both the fuel line and filter are clean and clear. Additionally, a dirty or clogged idle jet can also cause poor idle or stalling. This jet controls the flow of fuel at low throttle settings, so it is essential to keep it clean and free from any buildup. Regularly inspect and clean the idle jet to ensure smooth idle operation and prevent stalling.
Hard starting or rough running
If your 4-stroke dirt bike is experiencing difficulties with starting or running rough, it could indicate a problem with the fuel mixture. One common issue is a fuel mixture that is too lean or too rich. A lean fuel mixture can cause hard starting and a lack of power, while a rich fuel mixture can lead to rough running and excessive fuel consumption. To troubleshoot this issue, start by checking the fuel air screw.
This screw controls the fuel mixture at idle, and adjusting it can help improve starting and running performance. It’s important to find the right balance, so consult your bike’s manual for the correct specifications. If adjusting the fuel air screw does not resolve the issue, you may need to clean or replace the pilot jet, as a clogged or worn jet can also affect the fuel mixture.
Clogged jets or needle valve
Clogged jets or a faulty needle valve are common carburetor issues that can impact the performance of your 4-stroke dirt bike. Jets are responsible for regulating fuel flow, and if they become clogged with dirt, debris, or varnish, it can disrupt the fuel delivery to the engine. Similarly, a malfunctioning needle valve can cause fuel flooding or fuel starvation, leading to poor performance.
Regular maintenance and cleaning are crucial to ensure that these components remain clear of any buildup. You can use carburetor cleaner to remove any deposits and clear the jets and needle valve. If the jets or needle valve are damaged or excessively worn, they may need to be replaced. By keeping these components clean and functioning properly, you can ensure optimal performance from your dirt bike’s carburetor.
Frequently Asked Questions On How To Clean A 4 Stroke Dirt Bike Carb
How Do You Clean A 4 Stroke Carburetor?
To clean a 4 stroke carburetor, follow these simple steps: 1. Remove the carburetor from the engine. 2. Disassemble the carburetor carefully. 3. Clean all the parts with a carburetor cleaner. 4. Use a small brush to remove any dirt or debris.
5. Rinse the parts with clean water and let them dry. 6. Reassemble the carburetor and reinstall it back onto the engine. Remember to follow the manufacturer’s instructions for your specific carburetor model.
Can You Clean A Dirt Bike Carb Without Removing It?
Cleaning a dirt bike carburetor without removal is possible but requires careful cleaning methods.
Can A Carburetor Be Cleaned Without Removing It?
Yes, a carburetor can be cleaned without removing it.
How Often Do You Need To Clean A Dirt Bike Carburetor?
Clean a dirt bike carburetor every 6 to 12 months for optimal performance.
Conclusion
Keeping your dirt bike’s carburetor clean is crucial for optimal performance. By following the steps outlined in this guide, you’ll be able to easily clean your 4-stroke dirt bike carb, even if you’re a beginner. Remember to gather all the necessary tools and materials before you begin the process.
Start by removing the carburetor and disassembling it carefully. Clean each component thoroughly, paying extra attention to small orifices and jets. Use a carburetor cleaner and brushes to eliminate any built-up grime or debris. After cleaning, reassemble the carburetor with precision, ensuring all parts are in their correct positions.
Once reinstalled, run the bike and ensure it is functioning properly. Regular carburetor maintenance will save you both time and money, prolonging the life of your dirt bike. Don’t neglect this important task and enjoy an optimized ride with a clean carburetor.