To Cerakote dirt bike parts, start by thoroughly cleaning and degreasing the surfaces, followed by applying the Cerakote coating using an airbrush or spray gun. This will provide a durable and protective finish.
In addition, make sure to properly cure the coated parts to ensure optimal results.

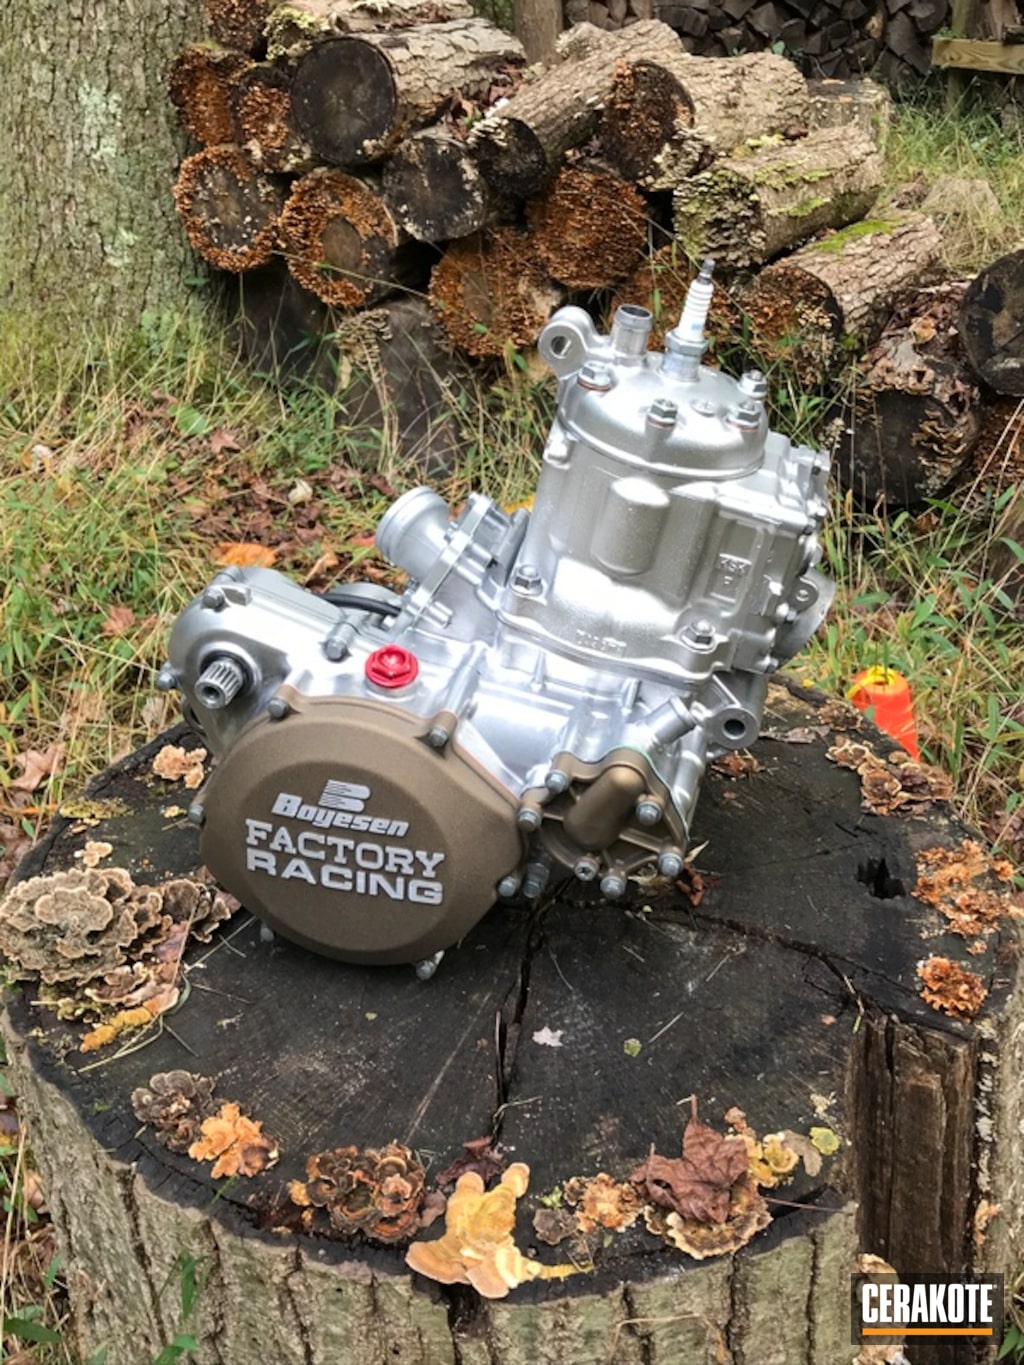
Credit: www.youtube.com
Benefits Of Cerakote Coating For Dirt Bike Parts
Cerakote coating offers several benefits for dirt bike parts, making it an excellent choice for protection and durability. One of the key advantages is its corrosion resistance. The coating creates a barrier between the metal parts and external elements, preventing rust and corrosion. This is especially crucial for dirt biking, where exposure to mud, dirt, and moisture is common.
Additionally, Cerakote provides abrasion resistance, ensuring the parts withstand any impact, scratches, or wear and tear during rides and races. As dirt biking involves extreme conditions, the heat resistance of Cerakote comes into play. The coating can tolerate high temperatures, protecting the parts from heat-related damage. Moreover, it offers excellent chemical resistance, safeguarding against chemical substances, such as fuels and solvents, that may come into contact with the bike parts.
How to Cerakote Dirt Bike Parts: Step by Step Guide
Preparing The Dirt Bike Parts For Cerakote Coating
To prepare dirt bike parts for Cerakote coating, gather the necessary tools and materials for the job. Begin by disassembling the parts carefully to ensure a thorough coating. Clean the parts meticulously to remove any dirt, grease, or debris that may affect the adhesion of the Cerakote.
Additionally, it is crucial to remove any existing coating or paint on the parts using the appropriate methods. This will ensure a smooth and even surface for the new coating. Finally, etch the parts to further improve the adhesion of the Cerakote. Following these steps will help achieve a professional and long-lasting finish on your dirt bike parts.
Applying Cerakote Coating To Dirt Bike Parts
When it comes to applying Cerakote coating to dirt bike parts, there are a few key steps to follow. First and foremost, it’s important to choose the right type of Cerakote for the specific parts you’re working with. This will ensure optimal adhesion and durability. Once you have the correct Cerakote, **mix it thoroughly** to ensure a consistent coating.
Next, start by applying a base layer of Cerakote to the parts. This will act as a foundation for subsequent layers. **Apply subsequent layers as needed** to achieve the desired thickness and coverage. It’s crucial to follow the recommended application thickness and cure times for best results.
Finally, once all layers have been applied, it’s time to cure the coating on the parts. This generally involves baking the parts in an oven at a specific temperature for a specified duration. **Follow the curing instructions** provided by the Cerakote manufacturer to ensure the coating fully cures and provides optimal protection and longevity for your dirt bike parts.
Tips And Techniques For A Successful Cerakote Coating
Proper ventilation and safety precautions are crucial factors to consider when cerakoting dirt bike parts. Ensure that you have a well-ventilated workspace to prevent inhaling harmful fumes. Wearing appropriate safety gear such as gloves, goggles, and a mask is essential to protect yourself from the coating chemicals.
Using a spray gun for the application of cerakote ensures an even and smooth coating. This tool allows for better control and coverage, resulting in a professional-looking finish. Remember to adjust the spray gun settings according to the manufacturer’s instructions for optimal results.
Pay attention to the curing time and temperature specified by the cerakote manufacturer. Following these guidelines ensures that the coating properly bonds to the dirt bike parts, providing durability. Failure to do so may lead to premature chipping or peeling.
Properly protect areas that should not be coated, such as bearings, threads, and engine components. Using high-temperature tape or silicone plugs can prevent unwanted coating on these sensitive areas. Take the time to mask off any parts that need to remain untouched.
Choose the right color and finish for your bike parts. Consider factors such as aesthetics, durability, and compatibility with the bike’s design. Opting for a color that complements the overall look of the dirt bike can enhance its appearance and make a statement on the tracks.
| Summary: | Cerakoting dirt bike parts requires proper ventilation, the use of a spray gun, adherence to curing guidelines, protection of sensitive areas, and selecting the ideal color and finish. Keep these tips in mind for a successful cerakote coating. |
|---|
Curing And Finishing The Cerakote Coated Parts
Once you have applied the Cerakote coating to your dirt bike parts, it is important to allow the coating to fully cure before handling or using the parts. This curing process typically takes around 24 hours, but it is recommended to wait at least 48 hours to ensure the coating is completely dry and hardened.
After the curing process, it is time to remove any masking materials that were used to protect certain areas of the parts during the coating process. Carefully peel off any tape or adhesive materials, taking care not to damage the coating or the underlying metal surface.
Once the masking materials are removed, inspect the coated parts for any flaws or imperfections. Look for areas where the coating may have chipped, cracked, or not adhered properly. If any flaws are found, you can touch up those areas using a small brush and the Cerakote coating material.
Finally, to further enhance the durability and longevity of the Cerakote coating, it is recommended to apply a top coat or protective layer. This additional layer will provide an extra level of protection against scratches, abrasions, and environmental elements, ensuring that your dirt bike parts stay looking great for even longer.
Maintenance And Care For Cerakote Coated Dirt Bike Parts
Regular cleaning and maintenance is crucial for ensuring the longevity and performance of cerakote coated dirt bike parts. When cleaning, avoid using abrasive cleaning agents or tools as they can damage the cerakote finish. Instead, use a mild soap and water solution and a soft cloth. Inspect the parts after cleaning and check for any signs of wear or damage.
If any areas show signs of wear, it’s important to touch up those areas to maintain the protective coating. Regular maintenance, such as lubricating moving parts and checking for loose bolts, is also recommended to keep the dirt bike in optimal condition. By following these maintenance and care tips, you can keep your cerakote coated dirt bike parts looking great and performing at their best.
Frequently Asked Questions Of How To Cerakote Dirt Bike Parts
Is Cerakote Good For Engines?
Yes, Cerakote is a good option for engines, providing durability and protection against heat and corrosion.
Can You Put Cerakote On Plastic?
Yes, you can apply Cerakote on plastic surfaces without any issues.
What Materials Can Be Cerakoted?
Cerakote can be applied to various materials, including metals, plastics, wood, and ceramics.
What Is Cerakote Coating?
Cerakote coating is a durable, protective finish for firearms and other metal objects. It provides corrosion resistance, improves performance, and comes in various colors and finishes.
Conclusion
Mastering the art of Cerakoting dirt bike parts can revolutionize the look and durability of your beloved two-wheeler. This process not only protects your bike from the harsh elements, but it also allows you to showcase your unique style and personality.
By following the step-by-step guide outlined in this blog post, you can confidently transform your dirt bike parts into visually stunning and long-lasting masterpieces. Remember to thoroughly prepare, apply the Cerakote coating with precision, and cure it properly for optimal results.
With a little patience, practice, and attention to detail, you’ll be able to achieve professional-grade finishes that will make your dirt bike stand out on the track or trail. So, don’t be afraid to get creative and give your dirt bike the upgrade it deserves with the art of Cerakoting!