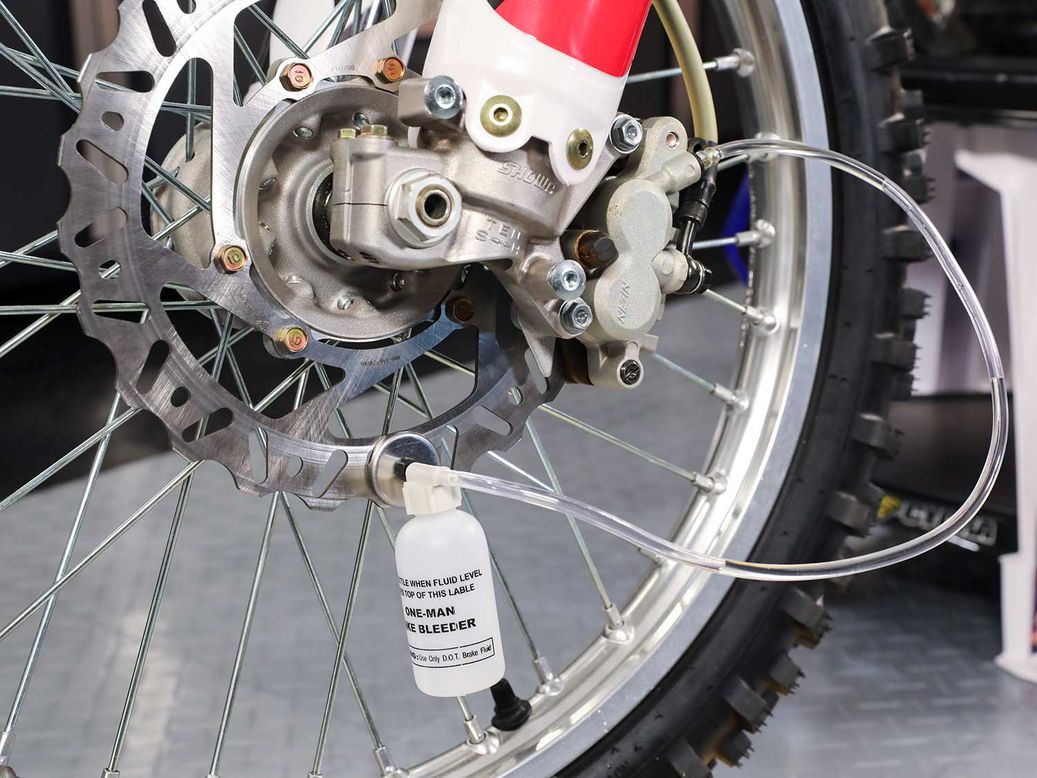
To bleed dirt bike front brakes, first, locate the brake bleed nipple and attach a clear hose to it, submerging the other end into a container of brake fluid. Starting at the master cylinder, loosen the bleed nipple and pump the brake lever several times until there are no air bubbles in the hose.
Lastly, tighten the bleed nipple and refill the master cylinder with brake fluid if necessary. Are you having trouble with your dirt bike front brakes? Bleeding the brakes can help improve their performance. In this guide, I’ll walk you through the steps to bleed your dirt bike’s front brakes effectively.
By following these instructions, you can remove air bubbles from the brake system and ensure smooth and reliable brake operation. So, let’s dive in and get your dirt bike’s front brakes in top-notch shape.

Credit: www.youtube.com
Tools And Materials Needed
For bleeding the front brakes of your dirt bike, you will need a few essential tools and materials. These include a clean cloth or rag, brake fluid, safety goggles, a brake bleeding kit (optional), and a brake bleed wrench. It is important to have all these items ready before beginning the process.
Brake fluid: This is a vital component in bleeding the front brakes. Ensure you have the correct type of brake fluid recommended for your dirt bike model.
Clean cloth or rag: This is necessary for wiping any excess brake fluid and maintaining cleanliness during the bleeding process.
Brake bleeding kit (optional): This kit can be helpful in simplifying the bleeding process. It usually includes a hose, nipple, and container for catching the fluid.
Brake bleed wrench: This specialized wrench is designed specifically for opening and closing the brake bleeding nipple.
Safety goggles: Protect your eyes from any potential splashes or spills of brake fluid by wearing safety goggles throughout the process.
How to Bleed Dirt Bike Front Brakes: Step by Step Guide
Preparing For Brake Bleeding
Please follow these steps to prepare for bleeding the front brakes on your dirt bike:
- Park the dirt bike on a level surface to ensure stability during the process.
- Safely remove the front wheel to access the brake system more easily.
- Clean the brake fluid reservoir and cap thoroughly to prevent any contaminants from entering the system.
- Gather all the necessary tools and materials for the brake bleeding procedure.
By properly preparing your dirt bike and gathering the required tools, you’ll be ready to move on to the next steps in bleeding the front brakes.
Locating And Accessing Brake Bleed Screw
| Steps |
|---|
| Identify the brake caliper |
| Locate the brake bleed screw |
| Remove any obstructions |
| Position the dirt bike for easy access to the bleed screw |
When bleeding the front brakes of your dirt bike, it is essential to locate and access the brake bleed screw properly. This ensures a successful bleeding process. Begin by identifying the brake caliper, which is typically positioned close to the brake rotor.
Once you have located the brake caliper, find the brake bleed screw on it. The bleed screw is responsible for releasing air and fluid trapped within the brake system. It is usually a small screw situated on the top or side of the caliper.
Before proceeding further, remove any obstructions that may hinder access to the bleed screw. Clean the area around it to avoid any dirt or debris entering the system during the bleeding process.
Position your dirt bike in a way that provides easy access to the bleed screw. This may require adjusting the handlebars or using a stand to lift the front wheel off the ground. Ensuring convenient access guarantees a smooth bleeding process.
Preparing The Brake Bleeding Process
Put on safety goggles to protect your eyes. Before you start bleeding the front brakes of your dirt bike, make sure to wear safety goggles to shield your eyes from any potential splashes or spillage. Safety should always be your top priority, and protecting your eyes is crucial in any mechanical task.
Attach a drain tube to the bleed screw. With safety goggles in place, proceed to attach a drain tube to the bleed screw. This tube will help in collecting the brake fluid that you will be removing during the bleeding process. It’s important to ensure that the drain tube is securely attached to prevent any leaks or mess.
Place a clean cloth or rag underneath the bleed screw. To keep your workspace tidy and prevent any brake fluid from spilling onto your bike or the ground, place a clean cloth or rag underneath the bleed screw. This cloth will absorb any fluid that may escape during the bleeding process, making cleanup much easier afterwards.
Bleeding The Front Brakes
When bleeding the front brakes of a dirt bike, there are a few important steps to follow. First, **loosen the brake bleed screw** to allow brake fluid to flow. Next, **slowly pump the brake lever** to build pressure in the system. Keep an eye out for **air bubbles in the brake fluid**, as this indicates the presence of air in the system.
Once all air is removed, **tighten the bleed screw** to prevent any leakage. It’s essential to **repeat the process if necessary** to ensure all air is removed completely. Lastly, be sure to **wipe away any spilt brake fluid** to maintain a clean and safe working environment. By following these steps, you can effectively bleed the front brakes of your dirt bike and ensure optimal braking performance.
Inspecting And Adjusting Brake Fluid Level
Inspecting and adjusting the brake fluid level is an essential step when bleeding dirt bike front brakes. Start by checking the brake fluid reservoir for proper level. If it is low, top up with the recommended brake fluid.
Make sure to securely replace the reservoir cap afterwards. Once done, you should test the brake lever for firmness and responsiveness. This will ensure that the brakes are working correctly and effectively. Regularly inspecting and adjusting the brake fluid level is crucial for maintaining the optimum performance of your dirt bike’s front brakes and ensuring your safety.
Reinstalling The Front Wheel
When reinstalling the front wheel of your dirt bike, it’s essential to clean the wheel axle and fork tube beforehand. This will help ensure a smooth and secure fit. Align the wheel with the fork, making sure they are properly aligned for optimal performance. Once aligned, you can install and tighten the axle nut, double-checking to ensure it is securely in place. Proper wheel alignment is crucial for safe riding, so take the time to ensure everything is aligned correctly. By following these steps, you can effectively reinstall the front wheel of your dirt bike and enjoy a smooth and controlled ride.
Final Check And Safety Precautions
The final step in bleeding dirt bike front brakes is to perform a thorough check and take safety precautions. Start by ensuring there are no brake fluid leaks. Inspect all the connections and fittings, and use a cloth or paper towel to wipe away any signs of leaks.
Once you have confirmed there are no leaks, it’s time to test the front brakes. Find a safe and open area where you can ride the bike. Apply the brakes gently and gradually increase the pressure to ensure they engage properly.
Remember to dispose of the used brake fluid properly. Brake fluid is hazardous and should not be poured down the drain or thrown in the garbage. Take it to a local recycling center or an auto parts store that accepts used fluids.
Lastly, clean up any spills or mess that may have occurred during the bleeding process. Use a clean cloth or paper towel to wipe away any excess brake fluid and ensure the area is free from any slippery residue.
Frequently Asked Questions Of How To Bleed Dirt Bike Front Brakes
How Do You Bleed Brakes On A Dirt Bike?
To bleed the brakes on a dirt bike, follow these steps: 1. Remove the brake fluid reservoir cap. 2. Attach a clear tube to the brake bleeder valve. 3. Pump the brake lever or pedal repeatedly to remove air from the system.
4. When the fluid runs clear, tighten the bleeder valve and replace the cap. Note: It is important to follow the manufacturer’s instructions and use the correct brake fluid for your dirt bike.
How Do You Bleed Front Brakes?
To bleed front brakes, follow these steps: 1. Locate the bleeder valve on the brake caliper. 2. Attach a clear plastic tube to the bleeder valve. 3. Open the valve and have someone press the brake lever. 4. Close the valve when the air bubbles stop coming out.
How Do You Reverse Bleeding Front Brakes On A Dirt Bike?
To reverse bleeding front brakes on a dirt bike, follow these steps: 1. Position the bike on a level surface and elevate the front wheel. 2. Loosen the bleeder valve on the front brake caliper using a wrench or pliers. 3.
Attach a clear plastic tube to the valve and place the other end in a container. 4. Squeeze the brake lever and pump it a few times to force the air out of the system. 5. Tighten the bleeder valve while the lever is squeezed, then release the lever gradually.
6. Repeat the process until no air bubbles are visible in the fluid. 7. Top up the brake fluid reservoir and ensure it’s at the recommended level. 8. Test the brakes to ensure proper functionality before riding the dirt bike.
Do You Have To Bleed Dirt Bike Brakes?
Yes, bleeding dirt bike brakes is necessary for optimal performance and safety.
Conclusion
To sum up, bleeding the front brakes on your dirt bike is an essential maintenance task that every rider should know how to do. It helps to ensure your brakes work efficiently and effectively, providing you with the stopping power you need while riding.
By following the step-by-step process outlined in this blog post, you can easily bleed your front brakes at home, saving you time and money. Remember to always prioritize your safety when working on your bike and take your time to complete each step correctly.
Regularly bleeding your brakes will not only improve their performance but also extend their lifespan, keeping you safe on the trails. So, don’t shy away from this crucial maintenance task and start bleeding your dirt bike front brakes today. Keep riding and enjoying your adventures with confidence!