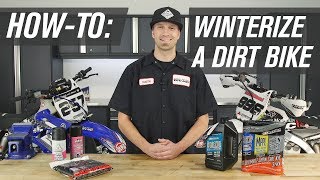
To winterize a dirt bike, drain the fuel, remove the battery, lubricate the chain, and store in a dry place. Winterizing your dirt bike is essential to prevent damage and ensure it’s ready to go when the riding season returns.
Taking a few simple steps can save you time, money, and headaches in the long run. We will discuss how to winterize a dirt bike efficiently and effectively. By following these steps, you can protect your bike from the harsh winter conditions and get it ready for a smooth start in the spring.
So, let’s dive in and learn how to properly winterize your dirt bike.
Credit: riskracing.com
Your Essential Checklist For Winterizing A Dirt Bike
Winter is just around the corner, and it’s time to start thinking about winterizing your dirt bike. Proper maintenance and storage during the cold months can help prevent damage and ensure that your dirt bike is ready to hit the trails when spring arrives. This essential checklist will guide you through the necessary steps to winterize your bike effectively.
Inspect and Clean Your Dirt Bike
Before you start the winterization process, it’s crucial to give your dirt bike a thorough inspection and cleaning. This will help identify any existing issues and prevent dirt and grime from causing further damage during storage. Here’s what you need to do:
- Inspect the frame, suspension, and chassis for any signs of wear or damage.
- Check the air filter and clean or replace it if necessary.
- Inspect the tires for any punctures or excessive wear. Replace them if needed.
- Thoroughly clean the bike, including the engine, exhaust system, and all external parts.
Prepare the Fuel System
When it comes to winterizing your dirt bike, properly preparing the fuel system is essential to prevent fuel-related problems. Follow these steps to ensure your bike’s fuel system stays in top condition during the winter months:
- Fill the fuel tank to the maximum capacity to minimize the risk of condensation.
- Add a fuel stabilizer to the tank to prevent the fuel from deteriorating over time.
- Start the engine and let it run for a few minutes to circulate the stabilized fuel throughout the system.
- Turn off the fuel supply and let the engine run until it stalls, completely emptying the carburetor.
Protect the Engine and Other Components
The cold temperatures of winter can be harsh on your dirt bike’s engine and other components. Here’s how you can protect them:
- Apply a thin coat of lubricant to exposed metal surfaces to prevent rust and corrosion.
- Remove the spark plug and pour a small amount of oil into the spark plug hole. Turn the engine over a few times to distribute the oil.
- Seal all air ducts and vents with plastic bags or tape to prevent moisture from entering.
- Protect the exhaust system by covering it with a plastic bag secured with a rubber band.
Preserve the Battery
During the winter months, it’s common for batteries to lose their charge. To preserve your dirt bike’s battery and ensure it’s ready to go when spring comes, follow these steps:
- Disconnect the battery and remove it from the bike.
- Clean the battery terminals with a wire brush and apply a thin layer of petroleum jelly to prevent corrosion.
- Store the battery in a cool, dry place away from any flammable materials.
- Periodically charge the battery to maintain its charge level throughout the winter.
Maintaining the Tires and Brakes
Properly maintaining your dirt bike’s tires and brakes during winterization is crucial for safety and performance. Here’s what you need to do:
- Inflate the tires to the recommended pressure to prevent flat spots from forming.
- Apply a thin layer of lubricant to the brake discs to prevent rust and ensure they don’t seize during storage.
- Check the brake pads and replace them if needed.
Store Your Dirt Bike Properly
Storing your dirt bike correctly is the final step in the winterization process. Follow these guidelines to ensure your bike remains in top condition:
- Store your dirt bike in a dry, well-ventilated area away from direct sunlight.
- Cover your bike with a breathable motorcycle cover to protect it from dust and moisture.
- Elevate your bike off the ground using a motorcycle stand or blocks to prevent flat spots on the tires.
Following this essential checklist for winterizing your dirt bike will help prolong its lifespan and ensure it’s ready for action when the warmer months arrive. With proper maintenance and storage, you can rest assured that your dirt bike will be in pristine condition and ready to hit the trails as soon as winter comes to an end.
How to Winterize a Dirt Bike: Step by Step Guide
Inspect And Clean Your Dirt Bike
Inspecting and cleaning your dirt bike is an essential part of winterizing it. Winter months can be tough on your off-road companion, with snow, moisture, and freezing temperatures potentially causing damage. By thoroughly inspecting, cleaning, and lubricating your bike, you can ensure it remains in top condition and ready for the next riding season. In this article, we’ll guide you through the process step-by-step, so you can confidently winterize your dirt bike and protect your investment.
Thoroughly Inspect the Bike for Wear and Tear
Before cleaning your dirt bike, start by conducting a thorough inspection of the entire bike to identify any visible signs of wear and tear. Look for cracks, frayed cables, loose or damaged wires, worn-out brake pads, or any other potential issues. Pay special attention to areas prone to damage, such as the frame, suspension components, chain, and sprockets. If you notice any significant damage, it’s best to address it before proceeding with the cleaning process.
Clean the Exterior of the Bike
Once you’ve completed the inspection, it’s time to clean the exterior of your dirt bike. Cleaning not only improves the bike’s appearance but also helps prevent the accumulation of dirt and grime, which can lead to corrosion and damage. Start by using a mild cleaning solution or bike-specific cleaner, and make sure to follow the manufacturer’s instructions. Gently scrub the entire surface of the bike, including the frame, plastics, seat, and wheels. Pay close attention to areas with stubborn dirt or mud buildup.
After cleaning, thoroughly rinse off the bike with water. Avoid using a high-pressure washer, as it may force water into sensitive components and cause damage. Instead, use a hose with a gentle spray nozzle or a bucket of water to rinse off any remaining dirt and soap residue.
Lubricate Moving Parts
Once the bike is clean and dry, it’s important to lubricate the moving parts to prevent them from seizing or rusting during the winter months. Apply a suitable lubricant to areas such as the chain, cables, pivot points, and suspension components. Use a quality lubricant specifically designed for motorcycles and follow the manufacturer’s instructions for application. Remember to wipe off any excess lubricant to avoid attracting dirt and debris.
Check and Tighten Bolts and Fasteners
In addition to inspecting and cleaning, it’s crucial to check all bolts and fasteners on your dirt bike. Riding off-road can cause vibrations that may loosen these components over time. Using a proper wrench or socket set, go through each area of the bike, including the handlebars, foot pegs, exhaust system, and engine mounts, and ensure that all bolts and fasteners are tightened securely. If you come across any damaged or missing bolts, replace them with appropriate replacements to maintain the bike’s structural integrity.
| Important Steps to Inspect and Clean Your Dirt Bike: |
|---|
| Thoroughly inspect the entire bike for wear and tear |
| Clean the exterior of the bike using a mild cleaning solution or bike-specific cleaner |
| Rinse off the bike with water using a gentle spray nozzle or bucket |
| Lubricate moving parts such as the chain, cables, pivot points, and suspension components |
| Check and tighten all bolts and fasteners using a proper wrench or socket set |
Prepare The Fuel System
When winterizing your dirt bike, it’s crucial to take care of the fuel system to ensure it stays in prime condition during the colder months. The fuel system includes the fuel tank, carburetor, fuel filter, and fuel line. By following a few simple steps in preparing this essential part of your dirt bike, you can prevent fuel-related issues and ensure a smooth start when spring arrives.
Stabilize the Fuel in the Tank
The first step in preparing the fuel system is to stabilize the fuel in the tank. To do this:
- Start by purchasing a fuel stabilizer suitable for your dirt bike.
- Park your dirt bike on a level surface and open the fuel tank cap.
- Using a clean funnel, pour the recommended amount of fuel stabilizer into the tank.
- Replace the fuel tank cap and give the bike a gentle shake to ensure the stabilizer mixes well with the fuel.
Stabilizing the fuel helps prevent it from deteriorating while in storage, minimizing the risk of carburetor clogs and other fuel-related issues.
Drain the Carburetor
Next, it’s important to drain the carburetor to prevent any residual fuel from causing damage during the winter months. Follow these steps:
- Locate the carburetor drain screw, typically positioned on the bottom of the carburetor float bowl.
- Place a container under the carburetor to collect the drained fuel.
- Use a wrench to carefully loosen the drain screw.
- Allow all the fuel to drain out completely.
- Tighten the drain screw back securely in place.
Draining the carburetor eliminates the risk of fuel residue congealing and clogging the carburetor jets, which can result in poor performance or starting issues when you’re ready to ride again.
Clean or Replace the Fuel Filter
The fuel filter plays a vital role in keeping your dirt bike’s fuel system clean and free from debris. Here’s how to clean or replace it:
- Identify the location of the fuel filter, either within the fuel tank or along the fuel line.
- If the filter is located within the fuel tank, remove it using a pair of long-nose pliers.
- If the filter is separate from the tank, disconnect it from the fuel line.
- If it appears dirty or clogged, clean the filter under running water until the water runs clear. Alternatively, if it’s damaged or worn out, replace it with a new one.
- Once cleaned or replaced, reinstall the filter securely in its original position.
A clean or new fuel filter ensures that only clean fuel enters the carburetor, preventing potential fuel system problems and allowing your dirt bike to run smoothly when you take it out of storage.
Disconnect the Fuel Line
Finally, it’s essential to disconnect the fuel line to prevent any fuel from reaching the carburetor during winter storage. Follow these steps:
- Locate the fuel line where it connects to the carburetor.
- Gently loosen the clamp or connector to disconnect the fuel line.
- Ensure the disconnected end of the fuel line is elevated to prevent any fuel from leaking out.
Disconnecting the fuel line prevents any residual fuel in the tank from making its way to the carburetor, providing added protection against potential fuel-related issues.
By taking the time to prepare the fuel system of your dirt bike before winter storage, you can safeguard against fuel-related problems and ensure a smooth start when it’s time to hit the trails again.
Protect The Engine And Other Components
Change the Oil and Filter
Changing the oil and filter is an essential step in winterizing your dirt bike and protecting the engine. Over time, the oil can become contaminated with dirt, debris, and moisture, which can cause corrosion and damage to internal engine components. By changing the oil and filter before storing your dirt bike for the winter, you ensure that clean oil is circulating throughout the engine, providing optimal lubrication and protection.
Grease or Lubricate Cables and Levers
Before you store your dirt bike for the winter, it’s important to ensure that all cables and levers are properly lubricated. Over time, these components can become dry and stiff, leading to increased friction and reduced functionality. By greasing or lubricating cables and levers, you ensure smooth operation and minimize the risk of damage during the winter months.
Check and Replace Spark Plugs
It is crucial to check the spark plugs of your dirt bike before winterizing it. Spark plugs play a vital role in the combustion process, and worn-out or dirty spark plugs can adversely affect engine performance. Inspecting the spark plugs and replacing them if necessary ensures that your dirt bike starts easily when you take it out of storage, and it maintains optimal performance throughout the winter season.
Protect the Exhaust System
The exhaust system is subjected to extreme heat and external elements, so it’s important to take the necessary steps to protect it during winter storage. One effective way to protect the exhaust system is by applying a high-temperature silicone spray or anti-seize compound to the joints and connections. This creates a protective barrier that prevents moisture, rust, and corrosion from forming. Additionally, consider using a heat shield or wrapping the exhaust pipes with heat-resistant tape to further safeguard against any potential damage.
Preserve The Battery
Preserving the battery of your dirt bike during the winter months is crucial to ensure its optimal performance when the riding season resumes. Taking proper care of the battery can prevent it from getting damaged or losing charge over time. Here are some steps you can follow to effectively preserve the battery of your dirt bike:
Remove the Battery
Before you start the winterization process, it’s important to remove the battery from your dirt bike. Removing the battery is necessary to prevent any drainage issues or accidental damage that may occur during the winter storage. Use the following steps to safely remove the battery:
- Turn off the dirt bike’s ignition and ensure the engine is cool.
- Locate the battery compartment usually located under the seat or within the frame.
- Disconnect the negative (-) terminal of the battery first.
- Next, disconnect the positive (+) terminal of the battery.
- Gently lift the battery out of the compartment, taking care not to drop it.
Clean and Inspect the Battery
Once the battery is removed, it’s essential to clean and inspect it thoroughly. Cleaning the battery helps remove any dirt, debris, or corrosive substances that may have accumulated over time. Follow these steps to clean and inspect the battery:
- Wipe the battery casing with a clean cloth to remove any surface dirt or grime.
- Inspect the battery for any signs of damage, such as cracks or leaks. If you notice any significant damage, consider replacing the battery.
- Check the battery terminals for corrosion. Corrosion can hinder the battery’s performance and lead to poor electrical connections. Use a battery terminal cleaner and a wire brush to gently remove any corrosion.
- Ensure that the battery cables are securely connected to the terminals. Tighten any loose connections if necessary.
Charge and Store the Battery Properly
After cleaning and inspecting the battery, it’s crucial to charge and store it properly to maintain its longevity. Proper charging and storage procedures will help prevent the battery from losing its charge over the winter months. Follow these guidelines:
- Use a battery charger specifically designed for motorcycle batteries. Avoid using automotive or standard chargers, as these may not provide the necessary charging parameters.
- Connect the charger cables to the correct battery terminals: red to positive (+) and black to negative (-).
- Follow the charger’s instructions to select the appropriate charging mode.
- Allow the battery to charge fully. Avoid interrupting the charging process before it is complete.
- Once fully charged, disconnect the battery charger, and recheck the battery’s voltage to ensure it is within the appropriate range.
- Store the battery in a cool, dry place away from direct sunlight or extreme temperatures. A battery storage box or a clean, non-metallic tray can be used to keep the battery secure.
By following these steps to preserve the battery of your dirt bike, you can ensure its longevity and maintain its performance during the winter months. Taking the time to remove, clean, charge, and store the battery properly will help you avoid any unpleasant surprises when it’s time to hit the trails again. So, make sure to give your dirt bike’s battery the attention it deserves as part of your winterizing routine.
Maintaining The Tires And Brakes
Proper maintenance of the tires and brakes is essential for the safety and performance of your dirt bike, especially during the winter season. Cold temperatures and snowy conditions can affect the traction and handling of your bike, making it crucial to pay extra attention to these areas. By following a few simple steps, you can keep your tires and brakes in optimal condition and ensure a smooth riding experience even in the harshest winter weather.
Check Tire Pressure and Tread
Before storing your dirt bike for the winter, it’s important to check the tire pressure and tread depth. Properly inflated tires provide better stability and control while riding. Using a trusted tire gauge, check the pressure of each tire and adjust it to the manufacturer’s recommended level. Additionally, inspect the tread depth to determine if it meets the minimum requirements. If the tread is worn out, it’s advisable to replace the tires to maintain adequate grip on slippery surfaces.
Lubricate and Adjust the Chain
The chain is a vital component that requires regular maintenance to ensure smooth operation. Before winterizing your dirt bike, clean the chain thoroughly to remove any dirt or debris that may have accumulated. Once cleaned, apply a suitable chain lubricant to prevent rust and corrosion during storage. Additionally, check the chain tension and make any necessary adjustments to ensure it is neither too loose nor too tight. A well-lubricated and correctly tensioned chain will provide better power transfer and extend the life of both the chain and sprockets.
Clean and Inspect the Brake Pads
The brake pads are responsible for stopping your dirt bike effectively. Therefore, it’s essential to clean and inspect them regularly. Begin by removing any dirt or mud from the brake calipers using a soft brush. Examine the brake pads for wear and tear, and replace them if necessary. Worn-out brake pads can compromise your bike’s stopping power and pose a safety hazard. By keeping them clean and inspecting their condition, you can ensure optimal braking performance throughout the winter.
Ensure Proper Brake Fluid Levels
Brake fluid plays a crucial role in the braking system, transferring the force applied on the brake lever to the calipers. As part of winterizing your dirt bike, check the brake fluid levels and top it up if needed. Low brake fluid levels can affect the brakes’ efficiency and result in poor performance. Ensure you use the recommended type of brake fluid specified by the manufacturer, and be cautious not to overfill the reservoir. Maintaining proper brake fluid levels will ensure your brakes are responsive and reliable, even in icy or slippery conditions.
Store Your Dirt Bike Properly
Winter weather can be harsh on your dirt bike, so it’s essential to store it properly during the off-season. By taking a few simple steps, you can ensure that your bike remains in excellent condition and is ready to hit the trails when spring arrives. In this article, we’ll explore how to store your dirt bike properly, covering topics such as finding a suitable storage area, protecting the suspension, using a breathable cover, and checking on your bike periodically during storage.
Find a Suitable Storage Area
The first step in storing your dirt bike for the winter is to find a suitable storage area. Ideally, this should be a dry and well-ventilated space, away from extreme temperatures and humidity. If possible, consider storing your bike indoors, such as in a garage or shed. This will provide the best protection against moisture and temperature fluctuations that can lead to rust and corrosion.
Elevate the Bike and Protect the Suspension
Elevating your dirt bike off the ground during storage helps to prevent flat spots from developing on the tires. You can use a sturdy stand or lift specifically designed for dirt bikes. Additionally, protecting the suspension is crucial to maintaining its performance. One way to protect the suspension is by using a bike stand that provides support under the frame and swingarm, taking the weight off the suspension components.
Cover the Bike with a Breathable Cover
Once your dirt bike is elevated and the suspension protected, it’s time to cover it with a breathable cover. A breathable cover allows any moisture trapped inside to escape while still offering protection against dust and debris. Make sure the cover fits properly and securely over the bike. Avoid using a plastic tarp or non-breathable materials, as these can trap moisture and lead to corrosion.
Check on Your Bike Periodically during Storage
Even though your dirt bike is in storage, it’s important to check on it periodically to ensure everything is in order. This includes inspecting the bike for any signs of damage or deterioration, checking tire pressure, and lubricating the chain if needed. By regularly monitoring your bike during storage, you can catch any issues early on and prevent further damage.
Storing your dirt bike properly is essential for maintaining its condition and performance during the winter months. By finding a suitable storage area, elevating the bike and protecting the suspension, covering it with a breathable cover, and checking on it periodically, you can ensure that your dirt bike is ready to hit the trails as soon as the snow melts.
Frequently Asked Questions For How To Winterize A Dirt Bike
How Do You Store A 4 Stroke Dirt Bike For The Winter?
To store a 4-stroke dirt bike for winter, follow these tips: Clean it, drain fuel, change oil, stabilize remaining fuel, remove battery, cover it.
How Do You Cold Start A 4 Stroke Dirt Bike?
To cold start a 4 stroke dirt bike: Turn on the fuel valve, pull the choke, and kick-start the engine.
Can You Store A Dirt Bike Outside As Long As It’S Covered Over The Winter?
Yes, you can store a dirt bike outside over the winter as long as it’s covered.
What Needs To Be Done To Winterize A Motorcycle?
To winterize a motorcycle, follow these steps: 1. Fill up the gas tank to prevent condensation and add fuel stabilizer. 2. Change the oil and filter to remove any contaminants. 3. Remove the battery or use a battery tender to keep it charged.
4. Store the motorcycle in a dry, sheltered area and cover it with a breathable cover.
Conclusion
Preparing your dirt bike for winter is essential to ensure its longevity and optimal performance when the riding season returns. By following the steps outlined in this guide, you can protect your bike from potential damage caused by cold temperatures, moisture, and corrosion.
Begin by cleaning and inspecting your bike, focusing on areas prone to dirt buildup and wear and tear. Next, perform necessary maintenance tasks such as changing the oil, checking the fuel system, and lubricating moving parts. Finally, store your dirt bike in a clean, dry place away from extreme temperatures and invest in a quality cover to shield it from dust and moisture.
By taking the time to winterize your dirt bike, you can extend its lifespan and be ready for some thrilling rides when spring arrives. Remember, preventive care is key to keeping your dirt bike in top shape!